dessert recipes

Last-minute holiday sweets: Easy desserts to pull together from stuff on hand

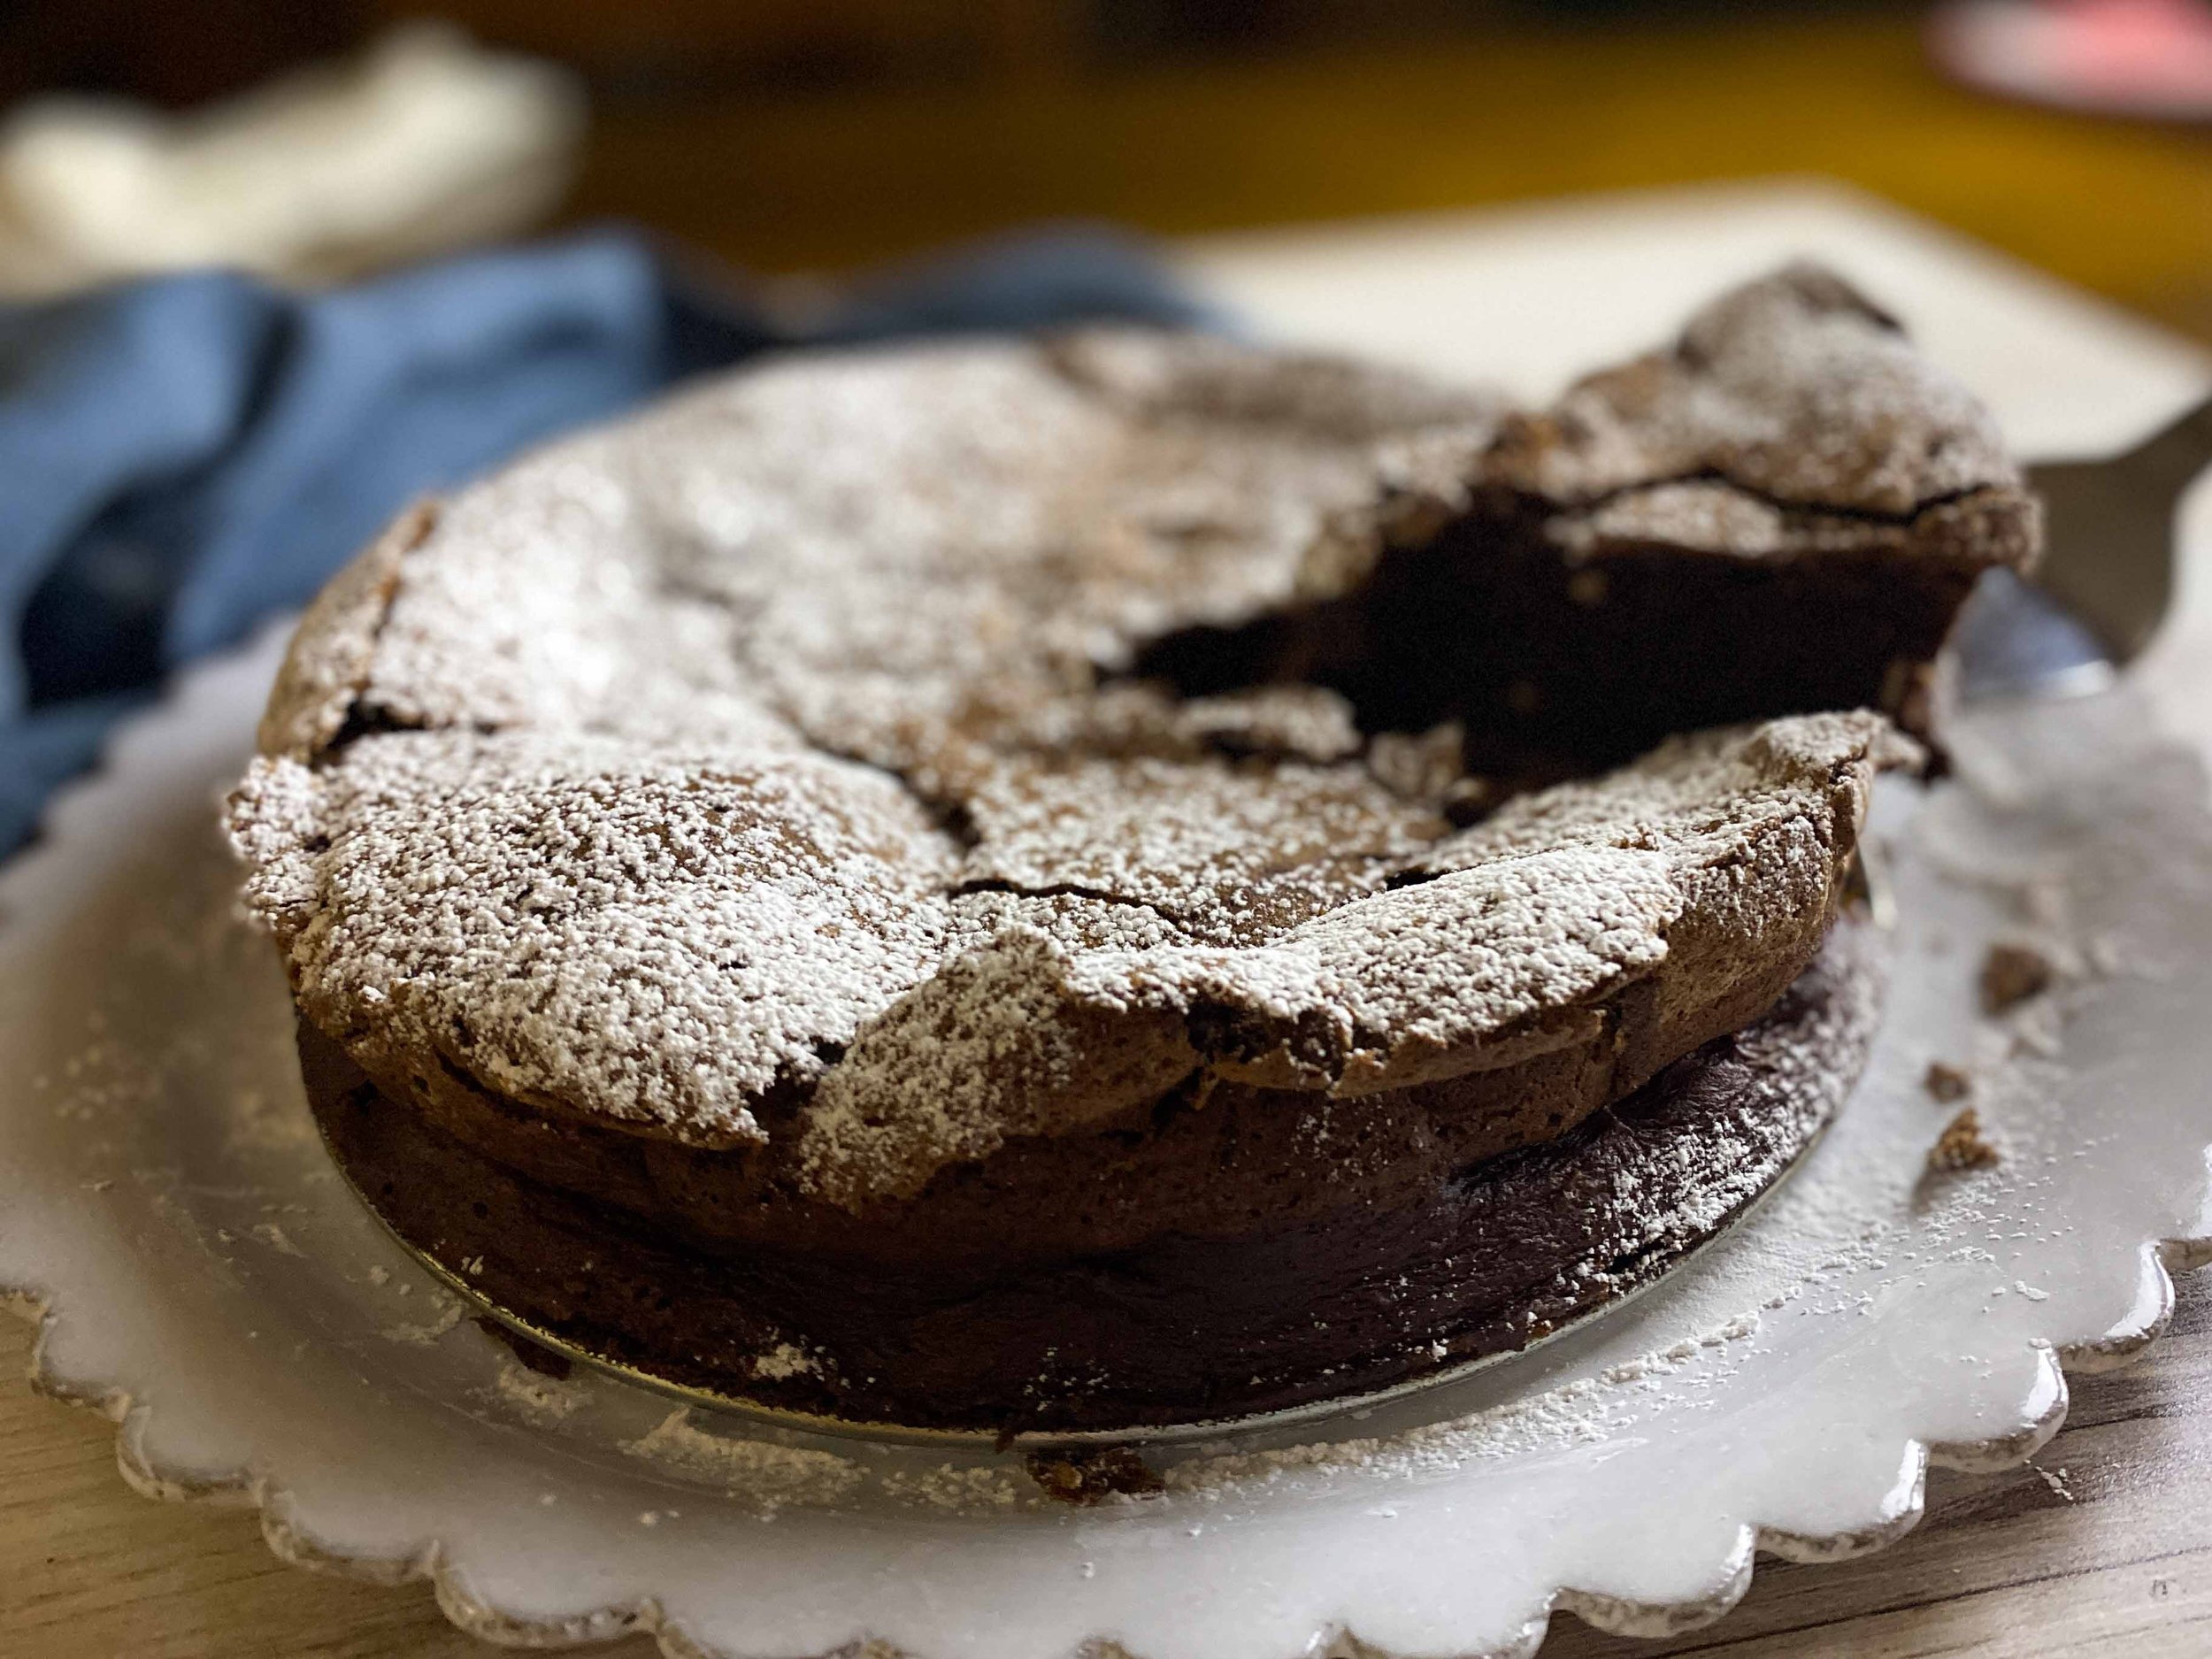
Torta al Cioccolato — flourless chocolate cake — from ‘Via Carota’ cookbook comes together with butter, eggs and two bars of chocolate.

By Leslie Brenner

Got a couple of chocolate bars, four or five apples or a pack of sliced almonds? If so, with a couple pantry basics you can pull together a festive last-minute dessert that will dazzle and delight.

For those of us who resist planning ahead (it wasn’t our fault, right?!) I’ve pulled together a few of my favorite easy treats — including ways to adapt to what you have on hand.

A sumptuous torta al cioccolato

The magnificent flourless chocolate cake shown above, with its crackly crust and moist, rich center, can be yours if you’ve got half a dozen eggs, two 3.5-ounce chocolate bars, sugar, salt and cocoa powder or flour for dusting the pan.

Apple-Calvados (or -Brandy, -Rum, or -Whiskey) Cake

During apple season, I try to make sure I always have four or five apples on hand — first because I love eating them, but also in case I feel like baking up this easy beauty. Any kind of apples will do.

The cake evolved from a Dorie Greenspan recipe that called for rum. I love it with the French apple-brandy Calvados to double up on the apple flavor, but any kind of brandy (American apple-brandy, Spanish Brandy de Jerez, French Cognac or Armagnac, etc.), rum or even bourbon or other whiskey work, too. The types of flour you can use are flexible, as well.

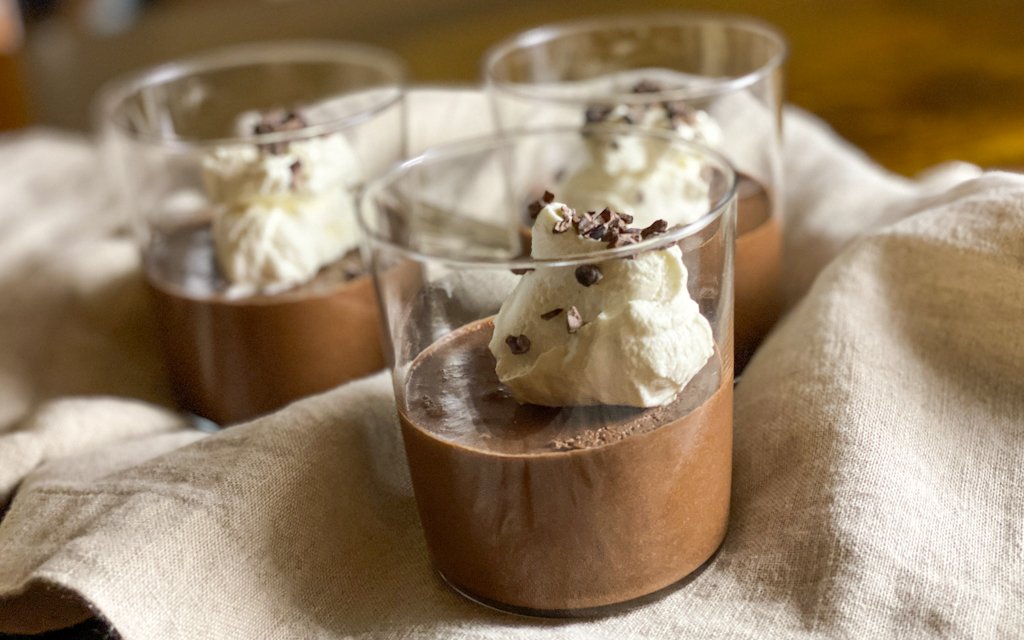
Your Favorite Chocolate Mousse

Here’s a chocolate mousse you can make if you have two 3.5-ounce chocolate bars and four eggs. Flavor it however you like: with vanilla or almond extract, just about any kind of liqueur, or espresso. The garnish is a free-for-all, too.

Almond Tuiles

Got sliced almonds? Make these crisp and pretty almond tuiles — which are lovely on their own or serve with ice cream or cake.

Tres leches cake is having a big moment. We love the super-luscious version from Mely Martínez's new cookbook

Tres leches cake garnished with thin slices of peach, shown on a white plate with a silver fork

Pastel de tres leches, or tres leches cake — Mexico’s star dessert — is enjoying a drenchy-sweet moment of glory.

The fluffy-creamy vanilla sponge cake, soaked in a mixture of creams (usually condensed milk, evaporated milk and heavy cream, and topped with whipped cream, has become an Instagram and Tik Tok star during the pandemic.

As G. Daniela Galarza wrote last week in an excellent story in The Washington Post:

“This past May, the month in which Trinity Sunday often falls, searches for “tres leches” were up 25 percent from May 2019. More than half a million posts are tagged #tresleches on Instagram, and on TikTok, nearly 25 million videos feature hands and pans whipping up batter for a tres leches cake.” 

Galarza’s story points to MM Pack’s illuminating 2004 story for the Austin Chronicle, “Got Milk?: On the trail of pastel de tres leches,” and then goes on to provide illuminating context and background.

The cake does not have a long history; it is probably only about a quarter-century old, according to Pack’s superb sleuthing. Nestlé, a major canned milk producer, introduced manufacturing plants around World War II in Mexico, and a recipe for pastel de tres leches was included. More investigation led Pack to find its antecedent: a dessert involving bread soaked in wine and layered with milk custard and fruit or nuts) came to Mexico in the 19th century.

All that is well and good, but The Great Confinement of 2020 continues to trigger cravings of comfort food and sweets. Fortunately, there are 9 and a half grillion versions to choose from.

The New York Times’ Melissa Clark, who may be some kind of dessert psychic — and who confesses to enjoying eating sweetened condensed milk straight out of the can — presciently published a recipe for a Seis Leches Cake (“A Milky Cake Where More is More”) in January.

We love the version Mely Martínez offers in her just-published cookbook The Mexican Home Kitchen, which we reviewed last month. Hers is not a sponge cake, but a somewhat denser vanilla cake with a lovely crumb; it takes longer (overnight) to soak up all those leches, but the result is outstanding.

About to attack my second slice of Martínez’s cake, on a whim I poured over it a splash of Plantation Pineapple Rum. Holy moly — it was insanely, wildly, wickedly good! Next time I’ll follow Martínez’s suggested variation and add a quarter cup of it to the milk mixture to soak in overnight.

RECIPE: Mely Martínez’s Tres Leches Cake

Mini strawberry Pavlovas may be the most brilliant Passover dessert ever

If ever there was a dessert meant for Passover, it's this one: mini strawberry Pavlovas. 

So, what's a Pavlova, anyway?

It's an Australian dessert named for the Russian ballerina Anna Pavlova (so the story goes), following one of her tours through Australia. Traditionally it's a large, thick meringue disk – hard and crisp on the outside, soft and pillowy on the inside – topped with whipped cream and berries or other fruit. Made this way, it's sliced into wedges to serve. 

Sized individually, mini Pavlovas are just as impressive, not to mention great for entertaining as they're so easy to make and serve. 

Why are mini Pavlovas so brilliant for Passover?

Let me count the ways:

1. There's no flour, making the dessert welcome at the Passover table.

2. They star strawberries, just as the fruit comes into the full flush of its season. 

3. They're beautiful and impressive-looking, yet easy and fool-proof to make.

4. You can make their meringue bases ahead of time – even the day before – and cut and macerate the berries in advance. All that's left to do last-minute is whip cream and assemble the Pavlovas, which is no harder than assembling strawberry shortcake. They're easy enough to manage during the craziness of a seder. 

Pavlovas aren't just for Passover

Pavlovas are having a moment in restaurants – at least here in Dallas, where one of the city's top pastry chefs, Keith Cedotal, is turning out beautiful individually sized versions, filled with citrus mousse and mixed berries, at fashionable Mirador restaurant. 

Besides being chic and delicious, Pavlovas also happen to be gluten-free – just the thing for gluten-intolerant berry lovers who are accustomed to passing up the strawberry shortcake. 

When I say Pavlovas are easy to make, I'm not kidding. All you do is whip up some egg whites, beat in sugar and, if you like, a touch of lemon or orange liqueur. If you want to get fancy, add some lemon zest. Spoon them into messy circles on a parchment-lined baking sheet and bake for less than an hour, till they're light golden and hard to the touch. 

Layer them with whipped cream and strawberries (macerated in a touch of lemon liqueur or orange liqueur if you like), and there you are. If they're messy, or the meringues break that's OK – disheveled is part of their charm. 

Brilliant, right? Here's the recipe:


Luxuriously rich, easy-to-make, flourless Mexican-chocolate cake is blow-them-away fabulous

MexChocSitHoriz.jpg

It all started with a recipe in Michael Solomonov's Zahav: A World of Israeli Cooking. The recipe, for a flourless chocolate cake – in which Solomonov and co-author Steven Cook use almond flour in place of wheat flour – is called "Chocolate-Almond Situation." I was drawn to the recipe because of its unusual name. Why "situation"?

Also, it looked so easy and good I couldn't resist. I melted chocolate, heated the oven, and went for it. 

Rich, luxurious and profoundly chocolatey, with a wonderfully moist, velvet-cream texture, the dessert was a big hit. And it was as easy to make as brownies. Another bonus: It's gluten-free. I posted a snap of it, with a description, on Instagram, tagged Solomonov and Zahav and added, "But still dying to know, Chef, why it's called a 'situation.'" 

"Gorgeous!" came the comment from Zahav. 

"Thank you!" I wrote. "Now why is it called a 'situation'?"

No answer. 

Meanwhile, I had an idea I couldn't get out of my head: Mexican chocolate. Wouldn't it be cool to make this cake using Mexican chocolate instead of regular dark chocolate? 

Last winter, my friend Michalene and I had enjoyed the most amazing Mexican hot chocolate at El Cardenal, a Mexico City restaurant known for its epic breakfasts. The drink, silky and incredibly rich, was prepared at the table by a waiter who used a molinillo, a traditional wooden chocolate whisk. I had to rush off early to catch my flight home, but Michalene surprised me by sending me a box of Doña Oliva chocolate tablets, which they use and sell at the restaurant. I was stunned to find that I could use a tablet to make a cup of chocolate almost as delicious as El Cardenal's; I've been rationing them ever since.

Since I'm always craving a cup, Mexican chocolate has been on my mind for months – especially since the start of winter. 

Could I maybe use the tablets to make a Mexican-Chocolate Situation? 

Nah...those tablets are too precious.

Meanwhile, I'd seen really cool-looking Taza organic Mexican-style stone-ground chocolate tablets at the supermarket. Maybe I could use those! But when I saw the price – they're $5 per 2.7-ounce tablet on the Taza website – I realized they'd be way too expensive, as we'd need four or five tablets for one cake.

Instead, I tried hunting down the Ibarra Mexican chocolate I grew up with. I didn't find it at my local supermarket, but found and purchased a box of Abuelita, another industrial brand.

What a disappointment: I brought it home and tasted it. It tasted nothing like chocolate. Just like sugar and chemicals. No way was this going into my cake (or yours). 

I was back to the drawing board.

Then, as she often does, Michalene came to the rescue. She suggested using the same high-quality 72% cacao chocolate I first used for the Situation and adding spices and other flavorings you'd find in Mexican chocolate. After all, I already had almonds in the almond flour. She suggested not just cinnamon and vanilla, which is what I'd naturally reach for, but also ancho chile powder and brandy. 

I made a couple other little tweaks to the recipe, for instance, changing the amount of chocolate to equal three 3.5 bars (10.5 ounces) rather than the 11 ounces the original called for. 

I whipped up the chocolate batter, added the ancho chile (just a touch), the cinnamon, the vanilla and brandy, mixed in the almond flour, spread it in a pan and baked.

Eureka! Same wonderful texture and richness, and now it had that dreamy Mexican chocolate flavor.

It was such a hit at dinner that one of my guests would not leave until I wrapped up two slices for him to take home.

You can bake it in a round pan and slice it into wedges, but be sure to make them small, as it is very, very rich. I'd say one 9-inch cake serves 10-12, rather than the 8 you'd expect. For an elegant dinner party, you might want to garnish it with a dollop of whipped cream, or whipped cream mixed with crème fraîche. You know what would be wonderful? Nata, the Mexican-style clotted cream El Cardenal serves at breakfast with the pan dulce known as a concha.

Or you can bake it in a square or pan and cut it into brownie-like bars. Dust them with powdered sugar or not, as you like. Honestly, they were so creamy, chocolatey and rich, they didn't need any adornment. 

Here's the recipe:

As for why it's called a "situation," well, that remains a mystery. Chef Solomonov, care to comment?


Blood orange panna cotta makes a dramatically divine (and surprisingly easy!) dessert

Blood oranges are the beach vacations of winter ingredients.

Huh? What? 

You know: It's cold out, and maybe gloomy. Maybe it's snowing. Maybe you have cabin fever. Maybe you're dreaming of stretching out on the sand on the Mayan Riviera under the sun, with crystal clear turquoise-colored water lapping at your toes. 

I'd love that, too. 

But instead, I'm going to reach for the next best thing: blood oranges. How lovely that something so juicy, so deliciously vibrant and summer-like comes into season in the dead of winter – and sticks around till May. 

A good part of their allure is visual. When they're whole, they look almost like regular oranges, but notice their slight rosacea blush. Slice one open, and it's gorgeous, its segments streaked in shades of crimson and and ruby red and blackberry. Now taste: They have a lovely flavor, sort of like oranges tinged with berry, or yes – cassis. 

In the United States, they're grown in California and Texas (two of the three states I have called home!). But I associate them with Rome, I think because once upon a time when I visited, I breakfasted on a hotel rooftop where they served crusty rolls with good butter – and glasses of fresh-squeezed blood orange juice. 

For cooks, blood oranges are a boon, as they're both delicious and dramatic. Count on them to elicit oohs and aaahs at the dinner table – especially if you spoon them over a delicately sweet, trembly-soft blood-orange-flavored panna cotta, Italy's famous custard-like dessert. 

Made from warmed, sweetened cream set with gelatin, panna cotta isn't a Roman dessert; it comes from Piedmont, according to The Oxford Companion to Italian Food, which also points out that it is "usually flavored with vanilla" (which I knew) "and peach brandy" (which I did not know). Often, the entry continues, it is served with fruit after it is unmolded, or with genuine balsamic vinegar. (Something to try! Though not with the supermarket stuff that passes for balsamic vinegar.) "It is increasingly popular with enthusiasts of the lighter side of Italian food," the 2007 book's entry concludes.

Indeed. Over the last decade, panna cotta has become a hugely popular restaurant dessert.

Happily, it is incredibly easy to make at home: In most versions, you bloom powdered gelatin over cold milk, then stir in cream that's been warmed just enough to dissolve sugar in it, cool the mixture, pour into custard cups, chill till they're set, then unmold just before serving. David Lebovitz, one of my favorite food bloggers, wrote recently, "if it takes you more than five minutes to put it together, you're taking too long!" He's not exaggerating.

Blood orange compote

Flavoring a classic panna cotta with blood orange juice gives it a delightful new dimension.  It's wonderful on its own, but top it with a compote of blood oranges and it becomes positively spectacular.  

A few thoughts about the panna cotta itself, before we get to the blood orange compote. Traditionally, it's made with cream, which makes a really rich and thick panna cotta. I like my panna cotta lighter – and more silky than velvety – so I swap out most of the cream for half-and-half. And I don't want it too stiff: soft and trembly is the idea, so I use the minimum amount of gelatin possible in order for it to hold its shape (more or less) after unmolding. (If you want yours to be a little stiffer, add an extra half a teaspoon of gelatin to the three teaspoons my recipe calls for.) 

Because it involves blood orange juice, my recipe is a little different from the traditional one: You sprinkle the gelatin over blood orange juice, let it sit, then heat it up and dissolve the sugar in the juice. Let it cool a little, then stir in the half-and-half, cream and either vanilla or orange liqueur. Pour it into custard cups (which you've lightly oiled) and let them set up in the fridge. 

While they're setting, you can make the compote; for this the only real work involved is cutting the oranges. If you're comfortable slicing suprèmes, go for it – they make a beautiful presentation. (That's what's shown above.) To do this, use a sharp paring knife to cut all the peel and pith off each orange, then slice between each membrane to release the segments, freeing them of all the membranes. With a little practice, it becomes very easy. (Here's a good walk-through on the technique from Serious Eats – scroll down to "Citrus Suprèmes" to find it.)

If you don't want to sweat it, just cut the peel and pith off the outside of each blood orange, slice it, then quarter the slices. It'll still be really pretty.

When you're slicing, be sure to capture all the juice that escapes –  you'll need half a cup for the compote. You might want to have an extra blood orange or two on hand just in case you don't capture enough juice. Heat that juice with some sugar, and cook it down till it's syrupy, then stir in a spoonful of Cognac or other brandy and pour it all over the orange segments. 

When you're ready to serve it, run a small, sharp knife around the edge of each custard cup, then invert it onto a plate or shallow bowl and let the panna cotta unmold. Sometimes you have to give it a little nudge with butter knife to release it. Divide the blood orange compote over the panna cottas and serve.

Alternately, if you don't want to unmold the panna cotta – either because it makes you nervous or you prefer a different look – you can serve the panna cotta in a wine glass or dessert glass and simply spoon some of the compote over it. 

I happen to think it's the perfect light dessert to follow a rich holiday dinner. Yes, like roast duck! Or a crown roast of pork, or a prime rib.  It's also a great finish to a lighter New Year's Eve dinner – maybe steamed lobsters, or other seafood. 

I know what you're thinking: Recipe, please! Here you go . . . 

Meanwhile, here's some good news: Blood oranges have a nice, long season – they're usually available into May in California and Texas. So if you happen to fall in love it this dessert – or with the blood oranges themselves (they're wonderful eat out of hand, as long as you're not wearing a white tee-shirt) – this could be the beginning of a long and beautiful friendship. 


Summer's most glorious make-ahead dessert: Cardamom-scented milk custard with apricot gel and crushed pistachio

My friend Greg Stinson is one of the best cooks I know. Part of it is his impeccable taste. He also has a finely tuned instinct for what flavors will shimmer brightest right now, this second, this season. And he knows what flavors will sing together.

And so when he was shopping for a dinner whose dessert would be cool, soft cups of cardamom-scented milk custard (that much he knew) and he happened on some blushingly beautiful ripe apricots, Greg's instinct kicked in and he took the custard idea from good to great. He'd capture that wonderful fresh apricot flavor in a gel on top of the custard, one that would be soft enough to ooze saucily into the cool, lightly sweet, exotically perfumed pudding. He divined just the right garnish, too: crushed toasted pistachios. 

How lucky am I to have Greg as a friend? Lucky indeed! That dessert was the captivating finish to dinner at the home of Greg and his husband Tim Simmonds a couple weeks ago.  It began with flatbreads (handmade by Greg) topped with juicy slices of sun-warmed tomatoes from Tim's garden. Next came beautifully spiced chicken kebabs, saffron rice (with a nice bit of crunchy tadig on the bottom!) and a lovely salad of chick peas, okra, tomatoes, eggplant and onion. It was all wonderful. 

And then those custards: so cool, lightly sweet, creamy and rich (but not too), just amazing with the vibrant apricot saucy gel that tasted like a sun-drenched orchard. On top of it, they were gorgeous in their green glasses on Greg and Tim's table.

I know what you're thinking. Yes, if you're lucky you can still find apricots in the market. The dessert, which channels the flavors of Turkey or Tunisia with its cardamom scent, pistachio crunch and apricot exclamation point, is ideal for making head – perfect for a laid-back late summer dinner party. 

It took Greg a couple of tries to nail the dessert, and not surprisingly he didn't measure things or write down what he did. "But Greg!" I protested, "this could be a smashing Cooks Without Borders dessert!" He walked me through what he did and the approximate amounts he used. I took a couple stabs at home and the recipe is now ready for you:

The custard – and eggless one – is easy to make, and sets up quickly in the fridge. Pour it into pretty heat-proof cups or ramekins. Then quarter the apricots – no need to peel them – and cook them down with a little sugar and fizzy prosecco till they're soft and translucent. A spin in the food processor and a trip through a fine sieve and you've got your gel to pour over the custards. Let them chill till after dinner, then top them with toasted crushed pistachios and serve. 

What can we say but three cheers for Greg?! 


Summer dessert slam-dunk: Make this dazzling (and fool-proof!) stone-fruit tart

After many a summer afternoon spent pitting peaches, slicing fruit, testing crusts and going back to the drawing board, I've finally got it: a stone fruit tart that's more than just beautiful. This one has that elusive quality we're all about at Cooks Without Borders: It's crazy good.

There are definitely crusts that are quicker to put together, but this one – my go-to short crust, adapted from Lindsey Shere's Chez Panisse Desserts – is preternaturally tender and buttery. Seriously, you won't believe how great it is. Though it takes some time (you'll want to start it in the morning, or the day before), there's not a lot of work involved, it's all about resting and chilling the dough. Best of all, it's easy and fool-proof: no rolling involved; you just press it into the tart pan.

Here's how easy it is: Combine flour, salt, lemon zest and a touch of sugar. Add butter, cut into pieces, and work the butter in with your fingers till it looks like this. Sprinkle on a tablespoon of water mixed with half a teaspoon of vanilla, work that in, gather it in a ball, wrap it in plastic, and chill it half an hour.

Now flatten the ball, set it in the tart pan, and use your fingers and palms to flatten it completely and press it into the corners. Keeping flattening and pressing, moving the dough around with your palms and fingers, until it evenly covers the pan. If it seems like it won't work, or it's not enough dough, or whatever, don't worry – it will work. When you're done it will look like this. Poke some holes it with a fork (that's called "docking" the crust, so bubbles don't form under it as it bakes), cover it with foil and stick it in the freezer half an hour or overnight. 

Bake it in a 375 degree oven till it's golden brown. Let it cool slightly, and you're ready to fill it.

Now the real fun begins. Spoon some preserves on the bottom of the crust: peach, apricot or plum, according to your taste and the stone fruit you're using, and spread it around. Gather your stone fruit: I used nectarines, black plums and apricots for this one. Peaches are great too, of course. If you can't decide between peaches and nectarines, consider that nectarines don't have to be peeled (neither do plums or apricots). Pit then and slice them into six or eight wedges each, depending on the size of the fruit. I used medium-small nectarines, and cut them each into six wedges; same for the apricots. 

Arrange the slices, starting with the outer edge of the tart, around the periphery, skin-side down, making them stand up against the edge of the crust as vertically as you can (which may be not very). 

Make another row, using a different fruit if you like (or the same one – whatever, it's your tart!). Use that second row to nudge the first row up vertically. I used nectarines on the outside row, then plums. Then do another inside that one: I used apricots. Then another, then fill in the middle, just standing them up any which way. 

Drizzle melted butter over the fruit, sprinkle it with sugar, then sprinkle it with thyme leaves, if you like. I love that, but if you don't like the idea of herbs on your fruit, you can just leave it off – or add a different kind of depth by cooking the butter before drizzling until it's browned and nutty-tasting. A note about the sugar: I only used a tablespoon, resulting in a tart with bright fruit flavor. It was just right for me, but I wondered if it was on the tart side for others. My friends and Thierry – who has a serious sweet tooth – said it was just right for them; they wouldn't want more sugar. If you like things on the sweeter side, use 1 1/2 or 2 tablespoons.

Into the oven it goes; half an hour later it comes out.

Pretty, ain't she? You can serve it a little warm, or completely cooled; it's great for entertaining, as you can make it in the morning, if you like, and let it sit all day. Serve it just like that, naked, or with a scoop of vanilla ice cream, or maybe a dollop of lightly sweetened crème fraîche.

Happy summer.


Say hello to a super easy (and crazy good!) berry and peach crisp

In case you haven't noticed, I love love love fruit desserts.

A few days ago I found myself in possession of a fridge drawer full of ripe peaches – placed in chilly purgatory against my better instincts. I get so excited during the season that I overbuy (how is it possible that I'm the only one in the house who snacks on them?), and in Texas almost-summer, they go from ripe to fuggedaboudit in no time flat. So into the fridge they went . . . and joined an embarrassment of blackberries and raspberries. 

Peaches . . . blackberries . . . raspberries . . . hey, wait a minute. Sounds like a crisp just waiting to happen! 

The simple topping on this one, inspired by one I've made a million times from Lindsey Shere's Chez Panisse Desserts, is something every fruit-dessert-lover should have in his or her repertoire. Nothing more than flour, brown and white sugar, salt and a pinch of cinnamon with some slightly softened butter worked in with your fingers and toasted almond slivers added at the end, it puts just the right not-too-sweet crunch on top of luscious fruit. Years ago something gave me the idea (David Lebovitz's blog maybe?) that you can double the amount of crisp and freeze half of it, so if a windfall of ripe peaches or nectarines comes your way, you can quickly achieve a repeat performance. Brilliant.

So, what to do with the fruit? Peel and pit the peaches (about two pounds) and slice 'em into a bowl. Rinse a few baskets of berries (blackberries, or a combo of blackberries and raspberries) and add them to the peaches. Sprinkle a tablespoon of flour and two tablespoons of sugar on the fruit, toss it gently, and turn it into a baking dish. Smooth out the top a little, then distribute the topping over all. Pop it in an 375 degree oven for about 35 minutes, et voilà. The juices, peach and berry wonderfulness mingled together – concentrated and syrupy – bubble up through the crust here and there as it bakes.

Sometimes I serve it warm with vanilla ice cream. Sometimes I whisk some crème fraîche into whipped cream and serve it with a dollop of that. This time I just made good old fashioned whipped cream (lightly sweetened, with a glug of vanilla) and plopped that on each slice.

It was so good, all that juicy fruit bursting with flavor topped by that miraculous layer of brown and buttery crispness, that we nearly wept. 

No one stopped at one piece.

Perhaps you'd like the recipe?


Nothing says spring like strawberry-mezcal ice cream

I don't know what inspired this exactly. Except it's spring, so I'm jonesing for strawberries. And it's spring, so I'm jonesing for mezcal. A friend was coming to lunch last weekend, and I wanted to cook Mexican. But dessert . . . strawberry shortcake? Nah. A big ol' Pavlova smothered in strawberries and cream? Nah. Almond cake with strawberries? Nah. None of it felt right to follow the lamb barbacoa tacos I'd planned. 

But ice cream! Who makes strawberry ice cream, anyway? I would! 

I figured I'd roast my strawberries, as they weren't exactly peak-season Harry's Berries (the fabulous ones I'd buy at the farmers market if I happened to be in Santa Monica). Roasting the supermarket berries would concentrate their flavor a bit. For some reason, when I thought about roasting them, I thought of hitting them with a little mezcal. In the back of my mind, I was remembering a wonderful nieve de naranja (orange ice) con mezcal my friend Michalene and I had when we were in Mexico City in February, at a restaurant called Fonda Fina. "Aha" moment! I thought mezcal might work well with the brightness of the berries. 

And so it did! Making the custard base is always easier than it sounds; just take it slow. Best to do this the day before you want to serve it, so the ice cream can set up in the freezer overnight – or at least for a few hours. In any case, you want to have time to chill the custard before it goes into the ice cream maker.

Want to leave out the mezcal? Just substitute half a teaspoon of vanilla. Or a teaspoon of aged balsamic vinegar. I served the ice cream with a couple of (store-bought) almond crisps.

Want the recipe? Here you go . . .