Vegan

Cool as a cuke: Four cucumber-happy salads to refresh you through a hot and heavy summer

Blimey, we all need a chill pill! In the absence of an effective one, we’ve been turning to the coolest of vegetables, the cucumber.

The Oxford Companion to Food tells us that the cucumber is “one of the oldest cultivated vegetables,” that it has been grown for some 4,000 years, that it may have originated in South India and that Christopher Columbus introduced it to Haiti in 1494. Jessica B. Harris points out, however, in The Africa Cookbook, that the some scholars feel that the cucumber may have come from Central Africa.

But wait — isn’t “one of the oldest cultivated vegetables” technically a fruit?

“It is a fruit,” says my friend Tim Simmonds, a Dallas botanist — and so are squashes, both summer and winter, including pumpkins. “Same big happy family.”

The curcurbit family, that is: the vine-y plant group that also includes watermelons, chayotes, gourds, cassabananas (a.k.a. melocotón) and the kiwano (a.k.a. African horned cucumber or jelly melon).

Given the cucumber’s origin story, it’s not surprising that it is popular in India — especially in the form of raita.

Cucumber Raita.jpg

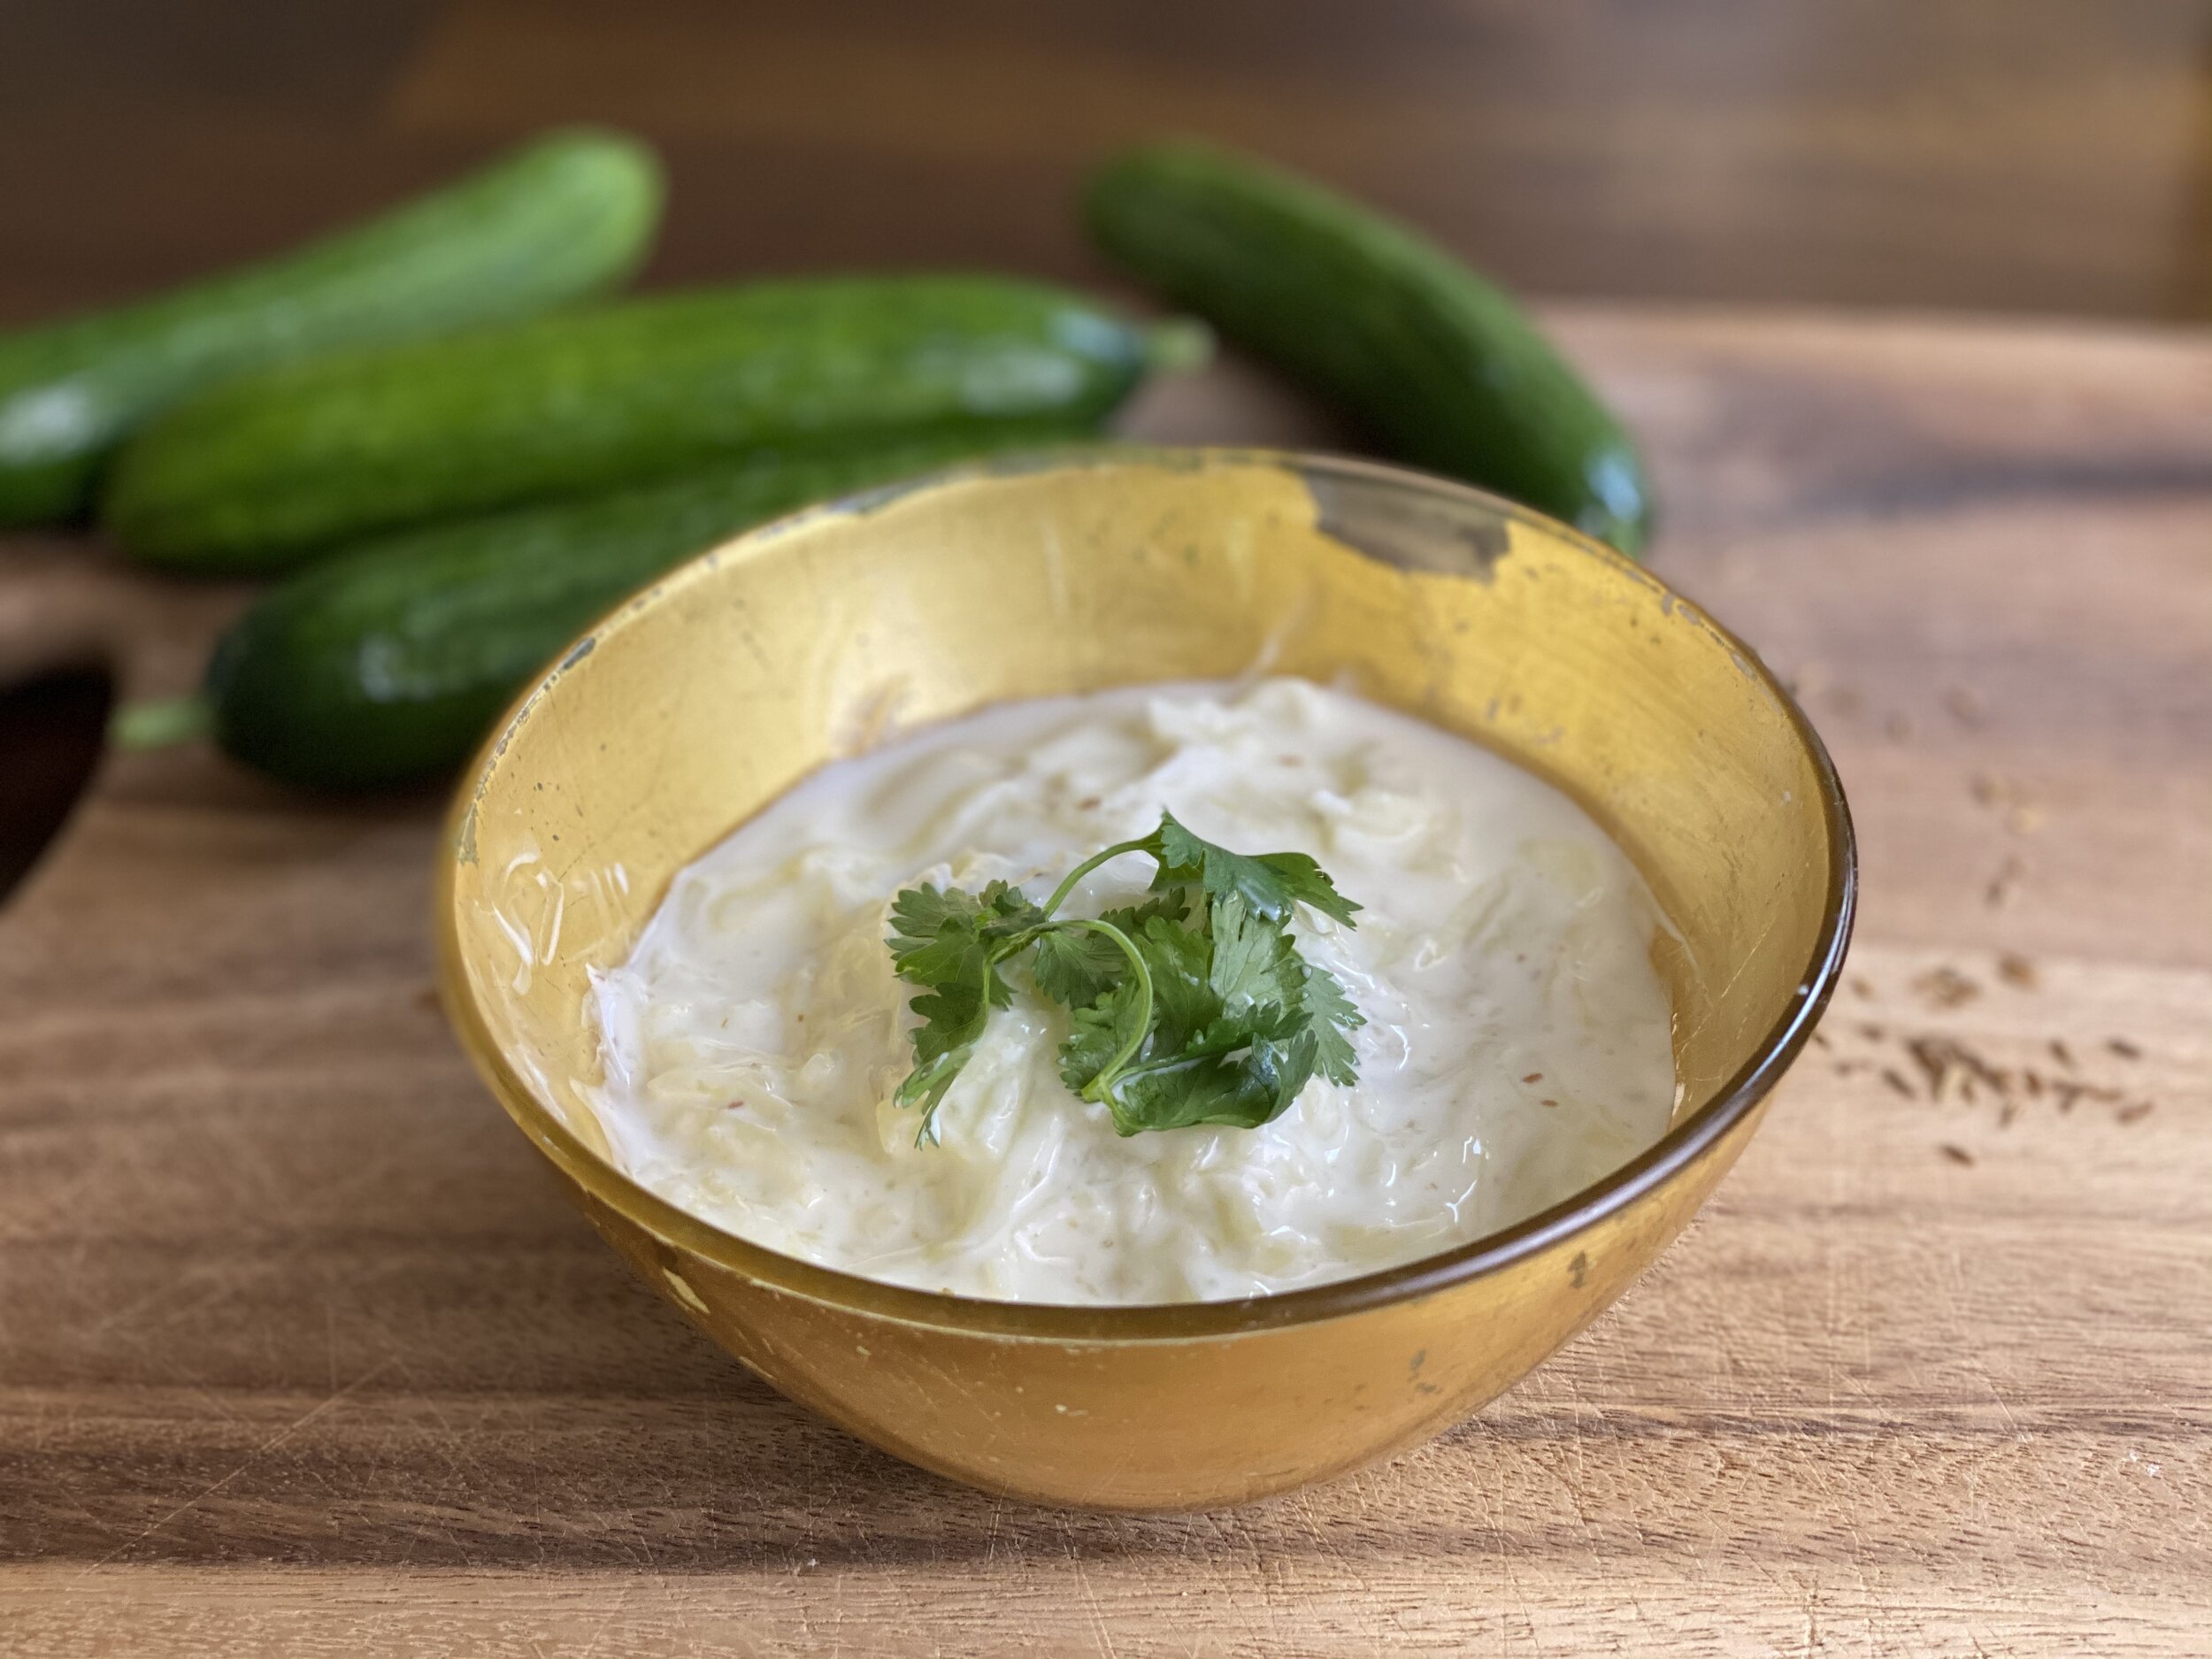
The cooling cucumber salad accompanies just about any kind of Indian meal, of course. But I’ve been known to enjoy a bowl of it on its own for a soothing lunch (particularly in a pandemic!).

Ours features grated cucumber, toasted cumin and a touch of lemon juice.

A Cucumber Sunomono was literally the first recipe we test-drove for our recent review of Sonoko Sakai’s Japanese Home Cooking, since the cucumber salad is a frequent starter of Japanese meals. This one, which weaves wakame seaweed in with the cukes, sports a jaunty grated-ginger garnish. We fell in love, not surprisingly. Maybe you will, too (let us know in a comment!).

Sunomono tight.JPG

Cucumbers also make appearances in Sakai’s recipe for Potato Salada and Dallas chef Justin Holt’s Salaryman Potato Salad.

But we’re not counting those in our four, so wait, there’s more!

Radish-cuke overhead leandscape.JPG

This pretty Cucumber, Radish and Feta Salad came together as we riffed on a Levantine dish called khiar bel na’na, starring thin-sliced cukes, dried mint and orange-blossom water. We added radishes, scallions, feta and fresh mint (which layers beautifully with the dried). Lately it has become a house favorite.

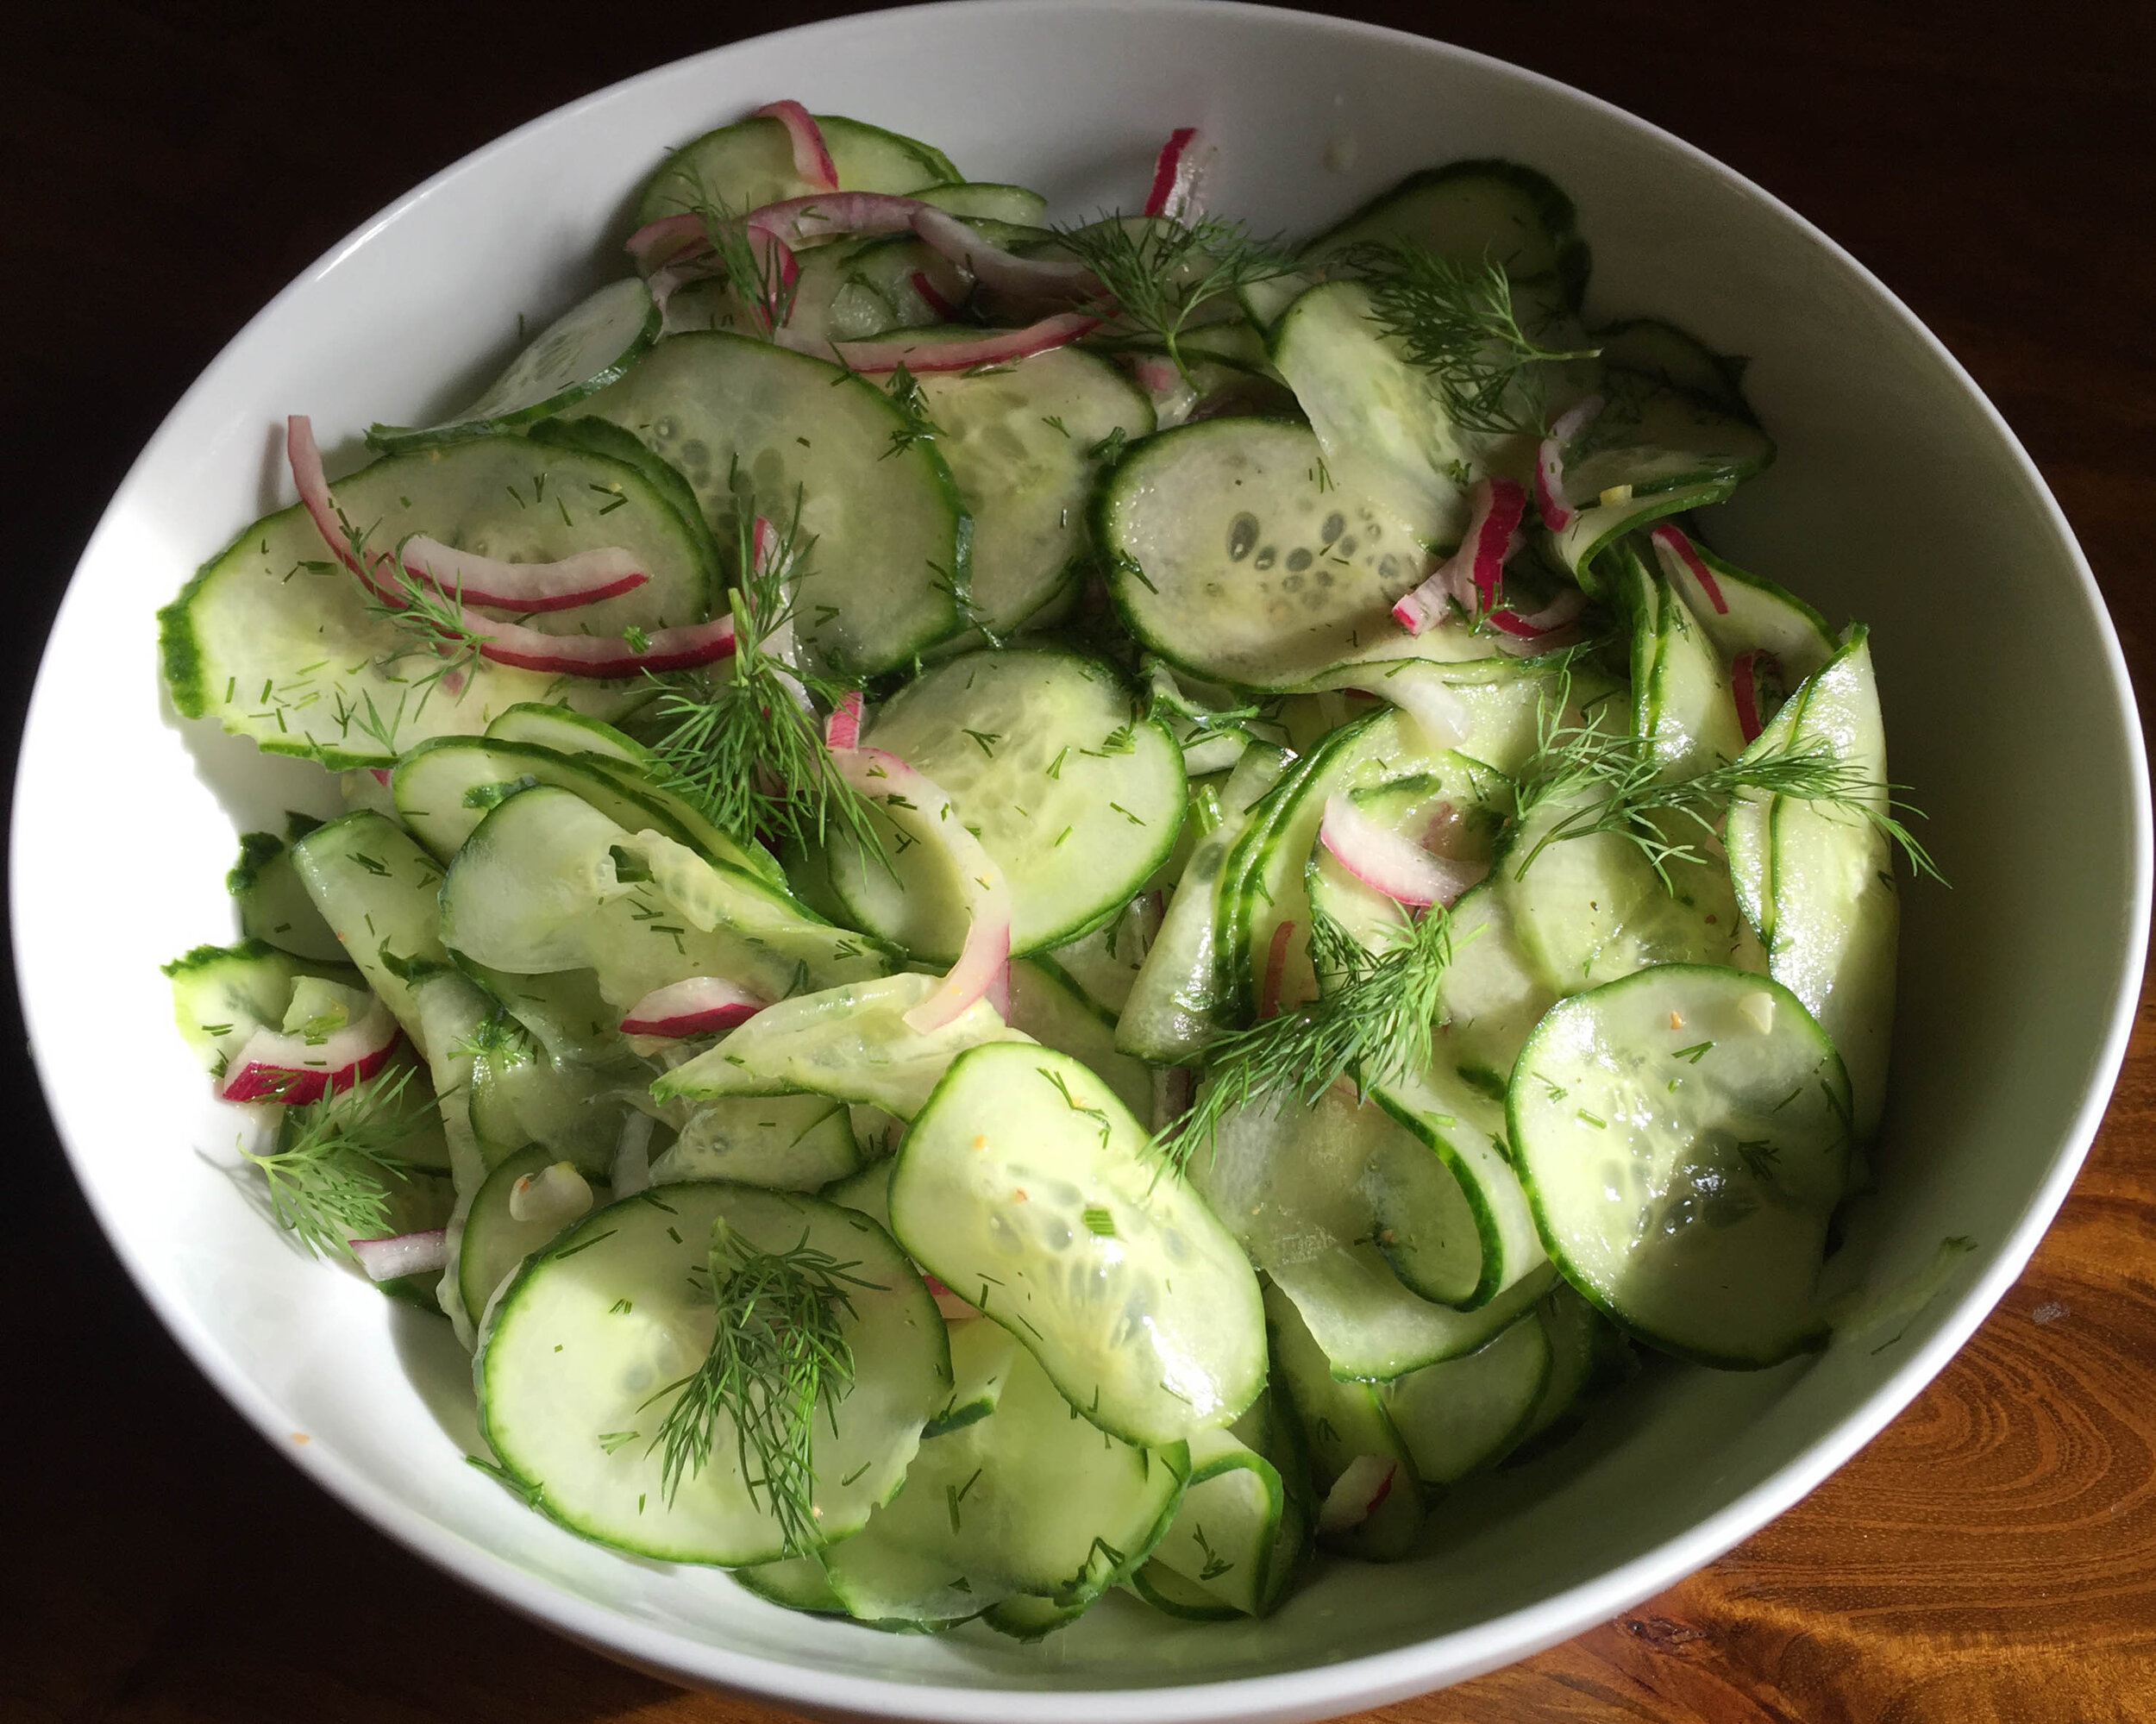
And finally, this Scandanavian Cucumber-Dill Salad — which is wonderful with poached salmon, Cold Poached Arctic Char or even Swedish meatballs.

Cucumber dill salad.jpg

A happy development, at least in my neck of the woods, is that organic Persian cucumbers have become more readily available, even during the pandemic. They have lovely texture (as long as they’re nice and fresh), they’re less watery than English cukes but more flavorful than most hothouse cukes, and they don’t require peeling — a win win win. Though sizes for all kinds vary, generally speaking you can figure two Persian cucumbers for one medium English cucumber, or three for a large English cuke.

As you’ll see from the above recipes, many cultures salt cucumbers and let them sit to draw out the water and ensure great texture; sometimes gentle squeezing is called for as well. Hope you enjoy these refreshing treats.

Stay cool. Think cuke. Wear a mask. Stay healthy.

[RECIPE: Cucumber Raita]

[RECIPE: Cucumber Sunomono]

[RECIPE: Cucumber, Radish & Feta Salad]

[RECIPE: Cucumber-Dill Salad]

Say hello to the green gazpacho of your dreams

Green Gazpacho.jpg

There are a grillion versions of green gazpacho out there — many of them likeable, some (like Yotam Ottolenghi’s in Plenty) lovable. But I’ve never found one that made me stop and say, OK, you are the green gazpacho of my dreams.

I enjoy versions with yogurt, but the green gazpacho of my dreams is vegan. And even though a gazpacho without bread is technically not a gazpacho, the green gazpacho of my dreams is gluten-free. That’s because when I crave green gazpacho, I’m craving something very clean and pure. I’m wanting something intensely chlorophyllic, and herbal — but also tangy.

The green gazpacho of my dreams is something I can throw together in a flash, as a satisfying and energizing lunch, or a refreshing prelude to a lovely summer or late spring dinner. It should be basic enough to make for myself and family on a weekday, but gorgeous enough to start off a celebratory dinner party with friends (if we are ever able to do that again!).

Green Gazpacho Banner.JPG

It has to have body, and a little richness. I’ve seen recipes for versions involving avocado, but I’m nor looking for that kind of unctuousness. (Though I do adore diced ripe avocado as a garnish on classic Gazpacho Sevillano.)

Sometimes the way out of a culinary conundrum like this is to go back to the basics. I looked to traditional ajo blanco, the cold almond and garlic soup from Malaga, Spain that’s also known as gazpacho blanco, white gazpacho.

Yes! Raw almonds add just the right body to this soup, without the tannic bite that’s so nice with the walnuts in Ottolenghi’s Plenty version. If almonds work here, perhaps raw cashews would as well. I tried that on round two, and liked it even better — it imparted a little more roundness and depth. But either works great.

You’ll want to use your best sherry vinegar and olive oil in this soup; they are more than just supporting players.

Here is your ticket to summer-long green greatness:

As you can see in the recipe, the ingredients are basic, easy to keep on hand for when a craving comes knocking. No need for advance planning, as you don’t need to chill it; just plop two or three ice cubes in each bowl before you serve. Or make it ahead, and chill it in the fridge. For maximum delight, garnish it with a flurry of soft herbs — any combination of dill, chervil, parsley, cilantro, basil, mint, chives, tarragon, celery leaves and sliced scallion greens (OK, those last two are not technically herbs, but you get the idea). Or just add a swirl of your best olive oil on top.

RECIPE: The Greenest Gazpacho

This refreshingly minty Levantine-style salad is missing a key ingredient — that's why we call it 'fattoush-ish'

What — no toasted pita?! That’s why we call this minty, sumac-y salad ‘fattoush-ish.’

What — no toasted pita?! That’s why we call this minty, sumac-y salad ‘fattoush-ish.’

Fans of fattoush — the bread and herb salad that’s popular through the Levant year-round — are divided about how toasted pita, a key ingredient, should play in the bowl. Traditionalists like the pita soaked in the salad’s lemon, olive oil and sumac dressing so it’s soft, like the soaky bread in a traditional Tuscan bread salad. Modernists add shards of well-toasted pita at the last second, for a crisp crunch.

Traditionally eaten at iftar, the evening meal that breaks the fast during every night during Ramadan, fattoush is delightfully light and refreshing. It’s a salad to riff on. Some cooks insist it must include purslane, the tangy salad herb that grows like a weed in the Mediterranean. (Stateside, you can often find purslane in Middle-Eastern or Mexican groceries.) Some versions of fattoush include green bell pepper; others don’t. Occasionally you see radishes. You can use scallions or onions, cherry tomatoes or regular ones, romaine or arugula, or both. Some versions go light on sumac, a bright-flavored, lemony spice; others play it up big. (Our recipe takes the middle sumac path.)

Fattoush-ish2.jpg

If you’re not already familiar with fattoush, it’s a great time to get to know it. Once you’re in possession of a jar of dried sumac and some dried mint (we favor spearmint), you might even be able to pull it together with ingredients on hand.

Craving fattoush’s minty, sumac-y, scallion-y flavors, I had everything but pita. (One of the challenges of The Great Confinement is not having all the ingredients required for culturally correct renditions of dishes.) I went ahead with the fattoush program anyway — and way glad I did.

Leave out the pita bread, as our recipe does, and suddenly you’ve got a delightful salad that satisfies anyone avoiding carbs: It’s gluten-free and paleo-friendly. It’s also just the thing to counterbalance all that heavy comfort food many of us find ourselves indulging in more often than usual. (Start dinner with fattoush-ish, and that giant plate of lasagna doesn’t count!)

Or go ahead and add some pita: One piece, split in half and each saucer-shape crisply toasted, makes it legit. Break the two toasted sides into bite-sized pieces before adding to the salad. Traditionalists, please double the dressing and toss the pita shards in half of it a few minutes before you’ll serve the salad. Modernists, add the shards at the very last minute.

Here’s the recipe:

RECIPE: Fattoush-ish

Hope you enjoy it as much as we do.

April 25 is Slow Food Youth Network's World Disco Soup Day: Let us help you build a rockin' soup!

Soup.jpg

Four years ago, Slow Food Youth Network founded an annual international event — World Disco Soup Day. On that day each year, parties are thrown in which food waste is turned into a disco soup. The goal is to end food waste, raise awareness around zero waste, feed people and celebrate when you do save food.

This year’s event is coming right up: Saturday, April 25.

It’s easy to celebrate saving food when what you create from food scraps is delicious. Which it can always be — and we’re here to help show you how to make it so.

Disco Soup.jpg

As part of the event, SFYN are asking participants to upload recipes from their elders that make delicious use of food scraps. I was about to do that, but when I was asked to start uploading ingredients and quantities, I realized it wasn’t going to work: This isn’t the approach we take when we cook this way. Instead, we peer into the fridge and think about how we’re going to use that cup of leftover black beans and those two boiled potatoes, those three celery stalks that are about to wilt and the cupful of arugula that’s too limp for a salad.

More often than not, we make a soup. And from now on, I’ll think of it as a disco soup! (Thank you, SFYN!).

We kicked off New Year’s in January by proclaiming 2020 The Year of the Soup, and gave a master recipe for making a Sunday Super Soup from stuff in the pantry and leftovers in the fridge. Here’s the story (which walks through how to change your relationship with food scraps), and here’s a more formalized version of the master recipe:

I’m hoping SFYN’s young members find the master soup recipe useful. (I’m a member of regular Slow Food USA, the Dallas Fort Worth chapter.)

If you’re not accustomed to cooking this way, now is a great time to start! You can be super mindful of not throwing out usable food scraps this week. Save everything. I use a dedicated zipper bag for odds and ends trimmed from carrots and onions, stray herbs, etc.

And we will help you strategize! If you find yourself with a cupful of white beans, some celery and half an onion, for instance, we’ll tell you how to turn that into a salad that makes a lovely lunch — or your own disco soup for next Saturday!

Just let us know in a comment at the end of this story. (PLEASE comment — we are eager to hear from you and engage!) We’ll suggest ideas — and everyone else can jump in an we can toss them back and forth.

In the meantime, we’re going to be thinking about ideas for cold disco soup, in case the weather is fine whether you might be on Saturday. Green gazpacho!

Sound good? Save scraps! Please share this story, with the hashtags #worlddiscosoupday #wdsd20 #Re_generation #fillbelliesnotbins #slowfoodyouthnetwork #sfyn

Plan for a big ol’ disco soup on Saturday, April 25. And stay safe.


Got romaine leaves? Turn them into tabbouleh- or tuna-cannellini salad-filled dream boats

Tabbouleh 1.jpg

It was a classic cooking-in-place moment: As I scrounged around in the fridge, even more mindful than usual of eating or cooking with every last veg before it wilted, I found a bag of romaine hearts that wasn’t nearly full enough to make a salad for the three of us.

The tender leaves still looked lovely, though — why not use them to scoop up something delicious?

More scrounging, and I found half a bunch of mint, two stray scallions and the better part of a bunch of Italian parsley: all things I didn’t have plans for in the next 48 hours and should be used. Got it — tabbouleh!

I knew I had bulgur (I do keep a well-stocked pantry) and a lemon, but there was just one hitch: no tomato. I did have some grape tomatoes, though — not the most flavorful things in the world, but the rest of the tabbouleh ingredients could lift them up.

Especially as I’d been playing with Annisa Helou’s tabbouleh recipe in her gorgeous, award-winning cookbook Feast: Food of the Islamic World. Her tabblouleh gets glorious depth from a Lebanese 7-Spice Mixture (sabe bharat) and cinnamon. (Don’t fret if you can’t manage the 7-Spice: Helou offers ground allspice as a sub.) If you do want to make the 7-Spice Mixture, here’s the recipe, which will fill your life with beguiling aromas, so it’s worth making just for that.

Lebanese 7-Spice.jpg

Into a salad bowl went chopped parsley, mint and those grape tomatoes (which I diced smaller than I would have an actual tomato), a little bulgur soaked briefly in boiling water and well drained, the spices, the juice of a lemon, a glug of good olive oil, salt and freshly ground black pepper. Tossed well, and onto a platter with those tender romaine leaves: voilà our excellent lunch on the fly!

After that I was thinking: This probably wouldn’t be the last time, during The Great Confinement, that we’d be faced with stray romaine leaves. Normally I’d tear them up and add them to other lettuces for a green salad, but salad greens these days aren’t necessarily a given. What else could romaine leaves be filled with?

Bingo: tuna and cannellini salad, which happens to be one of my pantry cooking favorites.

Tuna Bean Salad.jpg

Here’s the recipe, which calls for either a can of cannellinis or dried cannellinis:

How a bag of frozen peas got me through the zombie apocalypse and made it feel like spring

FullSizeRender.jpg

One frigid January a few years back, when I was in process of reviewing a big-deal chef’s new restaurant, I asked my server about the “garden English peas” in a menu description of a fish dish. No way anyone’s garden was producing English peas that time of year, I thought. The dutiful server headed to the kitchen and came back with Chef’s answer — the name of some local farm that was supposedly growing the peas for him. Mm-hm.

Not long after the review ran, the restaurant’s sous chef sent me a note: Those peas? They were frozen. The sous-chef was sure of this, he wrote, because Chef had sent him out to the supermarket to buy bags of frozen peas that afternoon.

My new BFF (sorry, Teach!)

My new BFF (sorry, Teach!)

Not that I’d been fooled. In the best of times, frozen peas are a savvy cook’s secret ally, so I’d figured that fish dish’s poetic menu flourish had been an icy deception.

Even in the best of times I keep a bag or two of frozen peas on hand. And now this crazy season, when gorgeous springtime produce is only the stuff of dreams, a bag of frozen peas has become my new best friend.

Use it to make a ridiculously easy minted pea soup that tastes as lovely as if you had shelled a bushel’s worth. It’s achieved by sweating butter lettuce in melted butter, adding frozen peas and water, simmering a bit and blitzing with a blender.

MintedPeaLowerRes.jpg

Defrosted frozen peas play a starring role in one of my favorite dishes in recent cookbook-publishing years: Chef Michael Solomonov’s quinoa, pea and mint tabbouleh from Zahav: A World of Israeli Cooking. Again, it’s a super-easy recipe that makes great use of ingredients that haven’t been hard to procure during the COVID-19 crisis.

Quinoa, pea and mint tabbouleh small.jpeg

And finally, my current favorite happy-hour bite: a creamy dip whipped up in a flash from frozen peas and ricotta, scented with mint and lemon zest. I like to swirl in a little extra ricotta at the end, but not all the way, so a swipe of a crouton gets a contrasty bite. It’s lovely with a glass of crisp white wine.

Pea Dip Square overhead.jpg

It’s just the kind of little luxury that could make you forget — if only for a moment — about the zombie apocalypse and imagine it’s a normal, delightful, optimistic spring.

RECIPE: Ridiculously Easy Minted Pea Soup

RECIPE: Quinoa, Pea and Mint Tabbouleh

RECIPE: Pea-Ricotta Dip

When life gives you masa harina, make tortillas — and tacos, and tortilla chips

Tortilla Chips.jpg

You’re craving pasta — but whoosh! All the boxes have flown off the shelves. Next you crave chocolate treats, so you bake — chocolate chip cookies, brownies, Brazilian chocolate cake. You run out of flour, and there’s no more to be had at the store (whoosh!). Eggs are nowhere to be found (whoosh!).

But there’s one fabulous comfort ingredient that doesn’t seem to be out of reach — yet, anyway: masa harina, the corn flour made from limewater-soaked dried corn kernels that is also known as maseca. Just mix it with warm water, give it a stir, and it instantly becomes a dough that you can turn into tortillas. Or sopes.

For me, it has come in handy half a dozen times in the last couple of weeks.

We craved huevos rancheros, but lacked corn tortillas. Out came the tortilla press; in ten minutes we had tortillas — which I fried, topped with fried egg, smothered in salsa ranchera. Craving satisfied.

Leftover roast chicken, chopped onion, cilantro and salsa verde suggested a taco lunch; masa harina to the rescue.

And at our sheltering-in-place happy hour a few evenings ago, three perfectly ripe avocados begged to become guacamole. We thought we had everything we needed: cilantro, white onion, half a tomato, two limes, salt and a single, solitary serrano chile. However — and this could have been a deal-breaker — no tortilla chips for dipping.

Bobs Masa Harina.jpg

Maseca saved us once again! We mixed up some masa, flattened it in the press, laid the discs on the griddle, then into the tortilla basket those golden babies went. I cut them into sixths, heated a pan of oil and started deep-frying: something I hadn’t done in ages. Sea salt ground to super-fine in a mortar was the finishing touch, and wow — our happiest happy hour to date.

I’ve used every supermarket brand of masa harina, and all have worked fine. But recently I fell in love with the organic masa harina produced by Bob’s Red Mill. A wee bit coarser than the supermarket brands, it produces tortillas with a little more texture, and lovely deep corn flavor.

Whatever masa harina you use, you’re going to be happy. Make chips. Make tortillas. Make tacos.

When I’m feeling a little more ambitious, I’ll try making tortillas without using the press (to aid those of you who don’t have one). And soon we’ll do a sopes story. Meanwhile, tortilla presses, which during normal times you can pick up at your local Mexican supermarket, are easy to buy online.

Lamb Barbacoa Tacos.jpg

There’s never been a time when handmade tortillas are more appealing or useful. Wrap any kind of stewy-saucy leftover in one, or serve them with a batch of chicken chile verde. Boil up a pot of pinto beans. (or open a can), add some grated jack and cilantro and you’ve got vegetarian taco event. Put out salsa, cilantro and diced onion, along with leftover chicken, beef, pork or lamb, and you’ve got a taco party.

Oh, and don’t forget the Taquería Carrots.

Need a lift? Throw together a batch of these spicy, zingy (addictive!) taquería carrots

Taqueria Carrlots landscape.jpg

UPDATED: August 2, 2020

First came the cravings for comfort carbs: mac and cheese (or any pasta smothered in sauce); warm chocolate chip cookies; sourdough bread. There’s a reason the boxes of pasta were the first edible things to disappear off the shelves in the early days of the Covid-19 pandemic.

After a week or two of that, I started craving anything tangy: the lemons and limes that were so hard to get our hands on, som tum (Thai green papaya salad); dill pickles.

I also kept thinking about the zingy, hot, crunchy pickled carrots we used to love munching in L.A. taquerías. Known in Mexico as zanahorias escabeches, they are super easy to achieve with very limited resources. And four and a half long months later, they still keep hitting the spot.

If you have any carrots in your fridge — and any kind of chile peppers — you can make these in just a few minutes. The carrot slices are cooked very briefly in a half-vinegar, half-water solution with salt and aromatics; chiles and onion are added off-heat to keep the flavors fresh.

They are just the thing to make a video-chat happy hour with friends even brighter. Mix a margarita, open a beer, show off your glorious carrots, crunch away, and dream together of a bright and pickly future.

Freshly baked pita bread can happen in your very own oven

EarlierPitaLandscape.jpg

There’s nothing like pita bread straight from the oven to scoop up just-made hummus or baba ganoush, swish into a lentil soup, or to wrap around left-overs — drizzled with tahini and hot sauce and brightened with fresh herbs.  

It’s not difficult to make pita — or khobz in Arabic — even if you’re not a seasoned baker. And it’s super fun. There’s an incredible reward at the end, when you look into the oven and see those bad boys magically puff up into bready balloons. You can actually watch them inflate!

It’s a lovely, soul-sustaining project to cheer up a day when you’re stuck at home for, ahem, whatever reason. Fresh-baked pita freezes brilliantly, so you can save some for later — or zip some up in a plastic bag and freeze it for an at-risk friend or relative who can’t leave home for groceries. (They’ll be perfect with the soup you made for them!)

During the pita baking process, there is a lot of resting and rising and waiting between steps — perfect moments for whipping up that hummus or baba ganoush, or chopping the vegetables for soup.

We are big consumers of pita at our house, largely thanks to my own personal baba ganoush and hummus addiction. The pitas are usually store-bought, and much to Thierry and Wylie’s chagrin, I usually come home with the whole wheat ones — which honestly are usually more like chewing on particle board than eating bread. In any case, we really consider them vehicles for the dips.

Best is when I can make it up north to my favorite Lebanese bakery and buy the freshly made ones, still warm in their plastic bags. There I usually buy both white ones and whole wheat. The white ones are gloriously puffy, fluffy and delightful; the whole wheat pitas — while undeniably better than the mass-produced ones — are, I have to admit, on the punitive side.

Because pitas are so ubiquitous through the Levant, I kept imagining that they couldn’t be all that hard to make, and learning how was getting higher and higher on my bucket list. Mine could split the difference between white and whole wheat and go fifty-fifty. The pita of my dreams! Surely it was attainable.

A couple months ago, I took the pita plunge — reading everything reliable I could find and starting to play with recipes.

Pita Landscape.jpg

Many of the recipes that looked serious enough for me to want to try them required a stand mixer, which I don’t own. (I never wanted to develop recipes that require one because I don’t feel a stand mixer should be a required piece of kitchen equipment.) Very few of the promising recipes I found called for more than a token amount of whole wheat flour.

Looked as though I’d have to develop my own. To do that I began swapping out whole wheat flour for half of the all-purpose flour in a couple of different recipes, sometimes adding extra water to compensate. Claudia Roden’s method in The New Book of Middle Eastern Food almost got me there, but the dough didn’t rise quite as much as I wanted it to.

Finally, I turned to Anissa Helou’s award-winning Feast: Food of the Islamic World, hopeful about Helou’s method because she has written such wonderful baking books (I love Sweet Middle East and have Savory Baking from the Mediterranean on my wish-list). Also, because pita bread (khobz) is literally the very first recipe in Helou’s 500-plus-page tome, I knew she must take her khobz very, very seriously.

Helou’s recipe calls for instant (fast-acting) yeast, and I wanted to use active dry yeast. (This may be a TMI situation, but active dry yeast keeps for a long time, and I wanted to develop a recipe that could be made without dashing to the supermarket; if you keep active dry yeast, flour, olive oil and salt on hand — which is so easy to do — you’ve got the makings for pita.) So I had to veer from her first few steps, and also had to find the right flour to water ratio.

But I was able to keep the heart of Helou’s method, the part that gets us from shaggy ball of dough to rolled-out discs ready to go into the oven. From Michael Solomonov and Steven Cook’s book Zahav, I borrowed the excellent idea of baking the breads on inverted baking sheets preheated in the very hot oven.

Watching the pitas puff inside the oven is the first payoff.

Watching the pitas puff inside the oven is the first payoff.

None of the recipes I consulted warned of what can happen if you let the baked pita breads cool completely before storing leftover breads: They can get stiff and crackly, not what you want. I added Roden’s suggestion to put them in a plastic bag as they come out of the oven, keeping them soft and pliable.

I hope you dive in and give this pita project a go; the process of kneading and rolling and waiting for the dough to rise is so wonderfully tactile, giving such a lovely rhythm to a day spent at home.

And the first payoff — that gasp of delight when you peer inside the oven and see the pita breads poofing up like balloons — is so much fun. The second payoff? That’s when you pull the first one apart and taste it — and marvel that it actually came out of your very own oven. Quick — get the baba ganoush!

OK, OK, enough lallygagging — to the recipe!

RECIPE: Pita Bread

Baba ganoush fever: How can burnt eggplant become a dip that’s so friggin’ brilliant and addictive?

Baba Ganoush.jpg

Five years ago, an 800-year old chickpea dip suddenly became a global obsession. Now, something tells us that baba ganoush — the smoky, lemony eggplant dip that’s a mezze-table favorite all over the Levant and beyond — may be about to steal the spotlight from its foodie-star brother.

Baba ganoush’s charms can be elusive to those of us who dwell in the Americas. Unless we have Levantine roots, we may not have been exposed much (if at all) to exemplary baba — or muttabal, as it’s called in Syria. The stuff you find in supermarkets, if you do manage to find one baba ganoush among the grillions of plastic hummus tubs that have taken over the refrigerated case, tends to be pale-flavored and forgettable. Meanwhile, I’ve read recipes that suggest adding Liquid Smoke. Liquid Smoke!

I knew that the babas that turned my head over a lifetime of eating in Lebanese restaurants were the unabashedly smoky ones. But somehow, I never wondered how they got their smoke. Or what gave the best ones their wonderful creamy texture. Or how much tahini, lemon or garlic would make a baba ganoush sing.

Somewhere in the back of my semitic mind I understood that the dish was related to the eggplant “caviar” my Jewish grandma used to make. (She roasted eggplants, cutting them in half first, but never long enough to get them smoky, and there was no tahini involved after that.)

Happily — life-changingly, perhaps — it’s easy to make a brilliant one, especially if you have access to an old-fashioned charcoal grill like a Weber. You can also make a pretty outstanding one using your kitchen broiler. In case you want to cut to the chase and achieve immediate baba bliss, here’s the recipe:

The technique is simple: Poke holes all over whole eggplants, then roast them, either under your broiler or directly on coals on the Weber, turning them once, until they’re completely charred and seem to collapse.

Eggplants roasting directly atop live coals in a Weber grill

Eggplants roasting directly atop live coals in a Weber grill

Cut them in half, scoop out the flesh — which will have taken on wonderful smokiness — place in a sieve and mash the flesh over a bowl to get rid of its bitter liquid and achieve a lovely soft texture. Separately, whisk together tahini and lemon juice till fluffy, then add the mashed eggplant, crushed garlic and salt. Spread the dip on a serving plate, drizzle on some good olive oil and scatter with chopped parsley, and you have baba ganoush heaven. Really, it’s that easy.

And it’s a fun dish to make. It’s fun charring the eggplants on the grill, and delightful when you whisk the tahini and lemon to fluffiness. It’s even fun to pull the flesh out of the charred skins with your fingers.

Once roasted, the flesh inside is meltingly tender.

Once roasted, the flesh inside is meltingly tender.

More on technical details in a moment, but first a word about baba ganoush’s history.

Curiously, I was unable to turn up much background about the dip, especially anything definitive. There’s no entry for baba ganoush (or baba ganouj, or baba ghanoush, or baba ghannuge, its alternate spellings) in The Oxford Companion to Food, or in The Encyclopedia of Food and Culture that takes up probably way too much real estate in my cookbook case. Unlike the Wikipedia page for hummus, which boasts two fulsome paragraphs about origin and history and nearly 700 words about regional preparations, Wikipedia’s baba ganoush wisdom is weirdly scant, pretty much limited to a stab at its etymology. (Baba, everyone agrees, is Arabic for “father” or “daddy,” and the Oxford English Dictionary suggests that Ghannuj is “perhaps a personal name.”)

The most intriguing tidbit I turned up came from my brilliant former colleague at The Los Angeles Times (now retired from the paper), Charles Perry, who wrote in a 1997 story about eggplant and its history that “The ancestor of today's baba ghanouj was flavored with ground walnuts instead of tahini.” Beyond that, we have only found speculation about the dish’s history. (If you are an expert, please weigh in with a comment! I am attempting to contact Charlie, who published Scents & Flavors: A Syrian Cookbook in 2017 — which I just ordered — and who I’m pretty sure possesses more intelligence on the subject; will update if successful.)

I found recipes for baba ganoush in some of my favorite cookbooks — including Claudia Roden’s The New Book of Middle Eastern Food and Arabesque and Yotam Ottolenghi and Sami Tamimi’s Jerusalem, and Annisa Helou’s splendid Feast: Food of the Islamic World, which won a James Beard Award in 2019. Online, J. Kenji López-Alt offers his serious take on Serious Eats; The Washington Post’s Smoke Signals columnist Jim Shahin wrote about it and gave a smoky recipe in 2018.

There are lots of recipes out there that include yogurt — which is also wonderful, but not the classic, and many recipes that simply roast the eggplant but stop well before optimum smokiness has been achieved.

Other recipes that I found to be almost perfect have some tiny little detail I felt could be improved. For instance, Serious Eats’ López-Alt calls for not pricking the eggplants, so they’ll cook more quickly and peel more easily, but he also points out unpricked eggplants will explode in your oven (yikes!). In addition, he calls for spinning the flesh in a salad spinner as a way of quickly getting rid of the bitter moisture in them after roasting, which I find cumbersome and messy. I much prefer Roden’s quick and easy solution: mashing the flesh with a fork in a strainer over a bowl; this is much faster than the slow-drain many other recipes call for, and adds no extra work as the flesh needs mashing in any case. (And not puréeing in a food processor, as some recipes recommend — you want to retain some lovely texture and not make it too smooth.)

Chasing optimal smokiness, perfect balance and the creamiest texture has kept me experimenting with recipes for a couple months in order to come up with the best method and proportions. I found that whisking the tahini with lemon juice, as in customary in some of my favorite hummus recipes, results in a baba with superior creaminess. (That idea came from a recipe in Arabesque for the variation of baba ganoush that includes yogurt.)

Yesterday, we finally put it all together — the proportions I favor, and the whisking, which left just one question to answer: Which is better, roasting the eggplant over live coals or under the kitchen broiler? And if one was better, how much better?

We put the two cooking methods to the test, by making two otherwise identical versions of baba ganoush, one using eggplant roasted on live coals (on a chilly Saturday afternoon in February!) and the other in the broiler.

Once they were ready, I spread them on their respective serving plates. Here’s how they looked before garnishing:

Baba ganoush prepared over live coals (left) and baba ganoush prepared in the broiler

Baba ganoush prepared over live coals (left) and baba ganoush prepared in the broiler

The photo probably doesn’t do justice to the visual difference, but the one done over live coals looked more emulsified and somewhat deeper in color. You could tell in whisking them, the live coals version was a bit silkier; though the eggplants seemed to be cooked about as much as the ones in the broiler, the ones done in the Weber were meltier.

In terms of taste and mouthfeel, the difference was starker: The one done on the coals had much smokier flavor, and more depth. I had Thierry and Wylie blind-taste them: The one done on the coals was the clear and immediate winner.

However, they (and we) loved them both: The broiler version was absolutely delicious as well, if a bit subtler. I thought of stirring in some ground cumin, a flourish that seems popular in the version of the dish that comes from Persia. You might consider using a slightly heavier hand with garlic if you go the broiler route, or upping the tahini a wee bit. This is a great dip to play with, to tweak it until it is exactly as you like it — or just cook kind of free-form, adding tahini, lemon juice and garlic by feel rather than measuring.

Another traditional flourish is pomegranate seeds — and once autumn rolls around, the baba ganoush will certainly flow freely at my place, topped with ruby-red beauties.

Until then, I’m loving the essentialist version, and we hope you will too.

RECIPE: Baba Ganoush

How to build the beautifully spiced, mega-healthy, plant-based, cross-cultural soup that could easily change your life

Everything Soup Harissa.jpg

It’s only a few days into the new year, but we’re tempted to proclaim 2020 The Year of the Soup. Yep, we’re thinking it’s going to be a soup-flavored year.

Here’s why. First, plant-based eating is on the rise, and soup is the ideal form for plant-based, soulful hankerings — including vegan ones.

Also, we’ll be hearing a lot about the importance of foods with anti-inflammatory properties this year, as chronic inflammation is now recognized as a major contributor to heart disease, cancer, diabetes and arthritis, and anti-inflammatory eating is widely seen as kind of a “fountain of youth.” Soup is an ideal vehicle to load up on anti-inflammatory superstar ingredients like turmeric — the #1 anti-inflammatory food, according to Michael Greger, M.D., who recently published a compelling new book, How Not To Diet. Ginger and garlic are the second and third most anti-inflammatory ingredients: also great friends of soup.

The most anti-inflammatory components of food, meanwhile, are fiber and flavones — both of which are abundant in the type of super-soup we’re about to provide a blueprint for.

Then there’s the emergence of the zero-waste movement. Making a big ol’ super soup lets you use up produce in your fridge you might have otherwise tossed (or composted) — limp celery, greens that have seen better days, carrot and onion trimmings, the stems of the broccoli from that Chinese recipe you made that called only for the florets, to name just a few. Have a little bowl of leftover sautéed spinach or roasted carrots? Into the pot they go. Make this soup once, and you’ll find yourself saving many more vegetable trimmings going forward (we keep a dedicated zipper bag for that purpose, so it’s easy).

Stuff that came out of our fridge: broccoli stems from a Chinese stir-fry that called for florets only; celery leftover from a crudité platter; a couple of forgotten halved onions, trumpet royale mushrooms from a dish we bought too many mushrooms fo…

Stuff that came out of our fridge: broccoli stems from a Chinese stir-fry that called for florets only; celery leftover from a crudité platter; a couple of forgotten halved onions, trumpet royale mushrooms from a dish we bought too many mushrooms for. The tough and woody parts of the broccoli stems will get peeled away and discarded.

January is our favorite month to fall in love with soup all over again, following all the holiday revelry — especially soups with health-sustaining properties (as we wrote about three years ago). The health benefits of onions, garlic, leeks, shallots (all members of the detoxifying allium family) and cruciferous vegetables like broccoli, cauliflower, Brussels sprouts and kale have all been well documented. And hey — they’re all awesome in soup!

Meanwhile, who couldn’t stand to lose a little weight? (It’s our resolution this New Year’s, and, ahem, every year). According to Dr. Greger’s book, if you’d like to lose weight, soup is your super food because it’s so filling, nutritious, fiber-filled and low-calorie. This type of soup is legume-based, relying on lentils, one of our favorite foods as lentils are earthy, ancient and soul-satisfying. The fact that they’re (surprisingly to those who don’t know their charms) quick-cooking is a giant bonus: It means this dish cooks in no more than about an hour. An Instant Pot would be even quicker.

Do you like spices? Greger’s meticulous survey of medical literature finds that cumin is a powerful appetite suppressants, and he recommends eating it every day. He also touts the truly awesome health benefits of nigella seed, outlined in this medical review, which calls it a “miracle herb.” Both happen to be wonderful in hearty vegan winter soups, as they’re traditionally eaten with lentils.

Finally, there is the flavor factor: This type of soup is so delicious, satisfying and beautifully spiced that we’d be thrilled to eat it even it it weren’t fabulous for our health and good for the planet (especially if you go for organic ingredients and minimal packaging).

Convinced? Hungry? Although we are providing a recipe with this, you really don’t need one — you just need the method — which couldn’t be easier. If you have time to chop things up and wait an hour, you have time to make it. In fact, because we can’t think of what to name it, we’ll call it Sunday Souper Soup.

How to build a Sunday Souper Soup

Mirepoix.jpg
  1. Sweat onions (and other alliuM) and aromatic vegetables

    Heat two or three tablespoons of olive oil (or grapeseed, canola or sunflower oil) in a large soup pot till shimmering, add chopped or diced onion (as much or as little as you like), carrots, celery and any other aromatics you like and have handy (leeks and turnips are nice additions). Toss in garlic (as much or little as you like, or leave it out) — smashed cloves, chopped, sliced, whatever — chopped ginger (if using) and cook another minute or so. You can also add chopped or sliced fresh mushrooms at this point; if you do, let them cook a few minutes till they start to give up their water.

  2. ADd spices

    Add ground spices such as turmeric (1 to 3 teaspoons is a good range; 3 makes it pretty turmeric-heavy), cumin, coriander seed, nigella seed. For best flavor use whole seeds and grind them yourself; toasting them in a small pan first adds depth, but isn’t necessary. You can also use pre-ground spices; nigella seed is generally used whole. Don’t know how much? Try a teaspoon of each you’re using (you can always adjust up or down next time). Stir in and cook two or three minutes.

  3. ADD LENTILS, water, tomato

    Use green, black, red, brown, yellow or any combination. We love green and black lentils, which keep their integrity, so always include one or both of those. Red and yellow lentils break down quickly into a soupy texture, so it’s nice to include one of those as well. But any lentils are fine. Two cups is a good place to start (that’s enough for a big pot), but the anything between one and two cups (or more) is fine. Rinse them well and toss them in, along with water (6 to 8 cups) and a can of chopped tomatoes (including the liquid). What size can? It doesn’t matter — just depends on how tomatoey you like it. During tomato season, of course, you can use fresh ones, if you like. Now’s the moment to add a bay leaf or three and/or dried mushrooms, if you’re using them (They are optional). You can pause for a cup of tea now, or take the time now to survey what else is in your fridge that you might want to add, and cut it up.

  4. ADD longer-cooking VEG

    All of the vegetables in this step are optional. If you want to use harder cruciferous vegetables such as Brussels sprouts, broccoli, cauliflower, rapini, broccolini and the like, you can cut them up and toss them in just after the lentils, or wait 5 or 10 minutes to toss add them. If you’re using very thick, tough broccoli steams, you might want to peel away the tough part on the outside before dicing. If you have cauliflower rice, that can be added now or closer to the end. Also add eggplant (peeled and diced), green beans, scallions, diced potato or sweet potato — anything you’d want to simmer for 20 or 25 minutes or so.

  5. ASSESS LIQUID, AND ADD SALT, PEPPERS/CHILES

    Check and see how your liquid is doing, adding a cup or two (or more) of water as necessary to get the soupiness you like. You can make it pretty soupy, or keep it thicker, like a vegan chili. Add salt (I start with about two teaspoons for a big pot and adjust up from there) and some kind of chile if you like (such as Aleppo pepper, cayenne, chile powder, Espellette pepper, etc.) Taste and adjust (you’ll adjust later again, so don’t worry if it’s not perfect — just don’t over-salt).

  6. ADD LEAFY GREENS, TENDER VEGETABLES AND HERBS

    What kinds of greens are cluttering up your crisper drawer — when we last made this soup, we had a quarter-head of napa cabbage, half a bag of arugula that had seen better days and a few escarole leaves we had deemed too ugly for a salad. Slice up larger greens (as we did the cabbage and escarole), and toss in things like arugula, baby spinach or baby kale whole. Other greens that would work great here are bok choy. When we make this soup and we don’t happen to have tired greens sitting around, we usually pick up a bag of baby kale, arugula or baby spinach, and dump that straight in. This would also be the time to add quick-cooking vegetables like zucchini (diced or sliced cut into half-moon slices), along with any leftover cooked vegetables, chopped up or cut into bite-sized pieces. Add chopped parsley (including stems), dill, mint, basil or whatever other fresh herbs you like at this point as well.

  7. TASTE, ADJUST SEASONING, ADD WATER IF NECESSARY, STIR AND SERVE!

Sunday Souper Soup is almost ready once the greens go in.

Sunday Souper Soup is almost ready once the greens go in.

How to use your Sunday Souper Soup, and why it may change your life

(Maybe you can suggest a better name? Tell us in a comment or shoot us an email at info@cookswithoutborders.com!).

• Make the soup on a lazy Saturday or Sunday afternoon (though any day will do) and eat it all week. I’m happy to eat it once a day, either at lunch or dinner, every day for a week, but other people might get bored and want it every other day or so. Either way, it is so healthy, filling and satisfying that you’ll be much less tempted to overindulge — thereby helping with health-minded and weight-loss-minded resolutions. You may want to add some water when you reheat, as it tends to thicken over time in the fridge.

• You can freeze some of it and keep some to eat this week.

• You can add to it, with delicious results. We just heated up the last bowl of a batch, which wasn’t quite enough for the two of us. We happened to have some leftover roasted Savoy cabbage and mushrooms, so we chopped those up and tossed them in (adding a little water), and the cabbage and ‘shrooms gave the soup a completely different quality. Fantastic!

• It’s the perfect vehicle in which to use nigella seeds, turmeric, cumin, dried chile and other ingredients getting attention for their awesome health-promoting properties.

• We love serve it with harissa to stir in at the end (everyone likes a different spice level). Other hot sauces work just as well — and they all have added health kick.

In case it’s helpful, here’s the Sunday Souper Soup in master recipe form:

We’d love to hear what you think of it — and we’d love to hear from you in general! Let us know (or ask questions about it) in a comment, or shoot us an email at info@cookswithoutborders.com.

Having friends over for dinner? Be sure to invite Mikie's fabulous marinated olives

One of the best parts of visiting my hometown, L.A., is dinner or lunch at my friend Michalene's. I've mentioned Michalene – or Mikie, as her family and a few close friends call her – in many posts. It was Mikie, for instance, who wondered, after a recipe for Chinese lacquered roast chicken changed my life, what would happen if I adapted it to duck. (Answer: more life-changingly delectable fowl play.) 

I met Mikie in 2003, when she was Food Editor at the Los Angeles Times, but I'd long been a fan. Before arriving at the Times a couple years earlier, she'd been Dining Editor at the New York Times, producing the Dining section that quickly, under her tenure, became a must-read. I hadn't realized I wanted to work at a newspaper – in fact I thought I didn't. But the minute I met Michalene, who invited me for a drink to discuss the possibility of my coming on board as her deputy editor, and she talked so excitedly about her love for cooking, and eating out, and editing and writing and putting together a food section, I knew I had to give it a go. 

Before long, we became not just co-workers, but fast friends. That meant we cooked and dined together often. It's one of the things I miss most about living in L.A.

So, dining at Mikie's. There are lots of great things about it. Hanging out with Mikie, and her partner Dan (who happens to be an amazing cook, too, and an awesome bread baker). They have an spectacular view of the ocean, over their rows of vineyards, from their house in the Malibu hills, so dinner's often on the patio. They are warm, generous, thoughtful and altogether brilliant hosts. 


I always secretly hope, as I drive up Pacific Coast Highway toward their place in Corral Canyon, that Mikie will have made her fabulous marinated olives: They're just so much better than any other olives anywhere, perfumed with orange and herbs, and spiced just so – a dreamy pre-main-event nibble.

A couple weeks ago, with friends coming to a dinner with a Spanish theme, I thought, as I tried to figure out the tapas y pinxtos, hey – why don't I make Mikie's olives? I texted her, asking for the recipe, and she told me it's from Mark Bittman's How to Cook Everything. – just tweaked a little. She adds orange zest, she tole me, and fennel seed. And she uses more vinegar than Bittman does, and less olive oil. Oh, and her technique is slightly different.

In other words, Mikie has made the olives her own. Honestly, I think it's the orange zest and fennel that knock them out of the park. 

How good are they? Well, I spent all day cooking to prepare for that dinner. I made bandilleros – all kinds of pickly and cured treats, prettily skwered. And some really nice tapas – piquillo peppers filled with brandade. And grilled asparagus with Serrano ham. And seafood paella. (OK, I blew the paella, if truth be told. Overcooked it terribly. Don't tell anyone.) Want to know what got the most applause? Mikie's olives. 

They take all of about five minutes to put together: It's just assorted olives (I like to use Castelvetranos, Picholines, Niçoises, Cerignolas and anything else that looks great – with pits), plus a few smashed garlic cloves, bay leaves, thyme branches, red pepper flakes, fennel seeds, orange zest, olive oil and red wine vinegar. Combine it all, and let it sit on the counter all afternoon – or even just an hour. Give it a toss with a spoon every now and then. That's it. 

Here's the recipe:

I will be eager to hear whether you love them as much as I do.


Warming lentil super-detox soup is a meatless Monday winter favorite

Warming Lentil Super-Detox Soup

Post-holiday food should never be about repentance. It should be about deliciousness and healthy renewal – clean eating at its best. 

That's why, after New Year's Eve revelry followed by an indulgent New Year's Eve lunch (on the heels of Christmas feasts and other holiday parties), what I craved for dinner was a warming bowl of chunky, vegan lentil-and-vegetable soup. Happily, I'd created one a couple weeks before – one that my family went crazy for. I'd whip up something like it again.

Only this time, I'd boost the turmeric, said to be a powerful antioxidant with terrific anti-inflammatory properties. And I'd add ginger, which I felt would work with the soup's flavors. And I'd try swapping in some red lentils, which have a softer texture than the green or black ones in the original. I didn't have any baby kale in the house, so I used baby arugula. And I left out the celery.

You know what? The soup was every bit as delicious; the ginger took it in a slightly different (and still wonderful) direction. 

It's a soup that can be all things to all people  or at least many kinds of people. It's vegan. It's gluten-free. The only processed ingredients are minimally processed (a can of tomatoes and the ground spices), so it's very clean. 

It's so soul-satisfying that carnivores probably won't miss the meat. Wylie, home for college for winter break, had three bowls. If you don't mention it's healthy, no one will be the wiser. 

Best of all, you can whip it up in a flash. Putting it together takes about 10 minutes, 15 max (if, say, you're in a post-holiday stupor). In less than an hour, it's done. 

Cooking for just one or two? Make a batch, eat some tonight, then take it to work later this week in a Thermos for lunch. 

Ready for the recipe? Here you go...

Happy New Year!!!

Delicious, soul-warming super-detox lentil-kale soup: Why wait till January?

It's only mid-December, and I'm already feeling like eating clean – at least in-between holiday parties and festive feasts. And here in Dallas, it's soooooo cold outside! 

What could be nicer, in such a circumstance, than the prospect of a big pot of soul-warming soup simmering on the stove? I'm thinking green lentils. And turmeric – for its strong anti-oxidant properties. And baby kale. And then a bunch of other stuff to make it delicious. 

That's what I thought yesterday morning, when it was 70 outside but I knew it was headed down to the 40s by the afternoon. 

I already had everything I needed to make the soup coming together in my head, except one key ingredient: I headed out at around 11 to pick up a cello-pack of baby kale at Trader Joe's.

By lunchtime the soup was ready – and the house filled with wonderful aromas. That's how quick and easy it is to achieve. 

The only work is chopping a few aromatic vegetables (onion, celery, carrot, garlic) and opening a can of tomatoes. (Make sure your tomatoes don't have sugar in them, or the soup won't be so detoxifying.) Sauté the veg in a little olive oil, add turmeric, coriander and herbs, then  the lentils, tomatoes and water. 

Did I mention that the recipe is vegan?

When the lentils are tender, throw in a bunch of baby kale, then let a cook a few more minutes till it all comes together. Lentils cook pretty quick, so it'll be done in just about an hour. 

Oh, baby – it turned out even better than I dreamed: lightly spiced, aromatic, earthy, soulful and satisfying. I knew Thierry would want some: Lentils are one of his favorite foods. But even Wylie (yes! He's home for winter break!) went along for the ride – that's how good it smelled. He'd just awakened at noon (college kids!) and had a bowl with us, just after his bagel and coffee. He loved it.

Here's the best part.  When I woke up this morning it was 15 degrees outside – 4 with the wind-chill factor. The tree is now decorated. We have plenty of firewood. This evening, we're going to our friends' holiday open house. 

Meanwhile, I know what I'm having for lunch.

How to be blown away by your own gazpacho

If you cook a lot, you've probably made gazpacho before. Maybe you've even made it dozens of times. But how often has it blown you away?

Just as I thought.

And just as we're heading into prime tomato season, it seems the right time to give the perennially popular cold soup – whose birthplace is southern Spain – a fresh look. As I wrote in a story that snagged me a James Beard Journalism Award some years ago, the soup's roots go back a long way: It was born sometime between the 7th and 13th centuries (depending on who you ask). In any case, it pretty clearly predates the arrival of tomatoes in Europe, which may come as a surprise to anyone who knows gazpacho as a cold tomato soup with cucumbers and peppers thrown in. In fact, gazpacho was originally a cold soup of pounded bread, garlic and salt with olive oil and vinegar pounded in. Some of those ingredients are often forgotten by modern American cooks, which is one of the many reasons gazpacho so often falls flat. Bread is essential for body, garlic for a little bite and vinegar for zing; a olive oil adds silkiness and its own fruity personality. 

In the summertime, when the weather's hot and tomatoes are bursting with flavor, gazpacho is one of my favorite things to make and eat. 

I approach it one of two ways. If I want a quick-as-possible version, I soak bread in sherry vinegar, toss it in the food processor with chopped tomatoes, cucumbers, a red bell pepper, a little water, garlic, salt and a pinch of red pepper, give it a whirl and serve it right away with a couple of ice cubes in the bowl. Chopped cucumber, peppers and maybe scallions go on top as garnishes. It's pretty damn good.

Gazpacho garnishes tight.jpg


But if I want a version that's absolutely stunning, I take just a couple of extra steps – peeling and seeding the tomatoes, straining the intensely-flavored juice that runs out of them and adding that to the sherry vinegar-soaking bread. I use a vegetable peeler to peel the red bell pepper. And after I purée the soup in the food processor, I give it a whirl with an immersion blender, to make it super-smooth and silky. The few minutes extra results in a gazpacho that's out-of-this-world elegant. 

A great Andalusian gazpacho depends on two things: ripe tomatoes with fabulous flavor, and the right balance of ingredients – including the vinegar and olive oil. If you get your hands on great tomatoes and use them in this recipe, I'm pretty sure you'll be blown away: 

Either way, I generally use the same or garnishes. If I make the super-smooth version, I'll take more care by dicing them finely rather then chopping them in a hurry – and sometimes add radishes and/or avocados. I can't think of a more stunning vegan summertime starter.

You can also follow the lead of chefs, and get all creative with the garnishes. Want to go super-splashy, maybe for a special dinner party? Top each bowl with a spoonful of lump crabmeat or diced cooked shrimp (or boiled tiny bay shrimp), plus some diced ripe avocado and a few pretty sprigs of frisée.

Whether you go the super-smooth route or the quicker route, I think you'll love it. Go ahead: Give it a whirl! 

 RECIPE: Gazpacho Sevillano

A million delicious ways to put asparagus on your springtime table (including some new ones!)

Goodbye, Brussels sprouts. Hello, asparagus – springtime's A-list vegetable.

Of course fava beans, English peas and artichokes rock the season as well, but asparagus stands apart, as it's so abundant and easy to get along with. If asparagus were as expensive as it was once upon a time, we'd likely celebrate it as a luxury, up there with morels and ramps and fiddlehead ferns. But it's not – which is why it finds a starring role on my table several times a week when it's in season.

There are a million delicious things you can do with it, from steaming to roasting to grilling to braising, sautéeing or stir-frying – even shaving the stalks with a peeler and adding them raw to a salad.

Most traditional is steaming it – in one of those upright baskets. I've never owned one; instead I trim the ends, use a vegetable peeler to peel the stalks halfway up or more, lay them flat in a wide pan and simmer them in salted water. After draining the stalks well, you can dress them in butter and serve them warm or send them to the table with a fluffy, lemony hollandaise. Or dress them in vinaigrette (that's lovely served warm, at room temp or chilled). Or keep them naked, chill 'em and serve with mayo. 

Easiest is roasting asparagus. A turn in the oven gives it a completely different character, no less delicious. Just snap off the tough bottoms or trim them with a knife, lay them on a baking sheet with a teaspoon or so of olive oil and a sprinkle of salt, roll the stalks around to coat them, and roast for 17 minutes (for stalks of medium thickness) at 400 degrees F.

Grilling is nearly as easy: Brush the stalks or roll them around in a little olive oil, sprinkle with salt, toss them on the grill or a hot grill pan and cook until they're just tender.

One mistake people (including home cooks and many a restaurant) often make: undercooking them. They shouldn't be crunchy; they need to be tender. How to know when they're done? Use tongs to lift them up by the middle of the stalk. When they're done, they'll droop a bit on either side. 

Roasted asparagus and radishes from Steven Satterfield's Root to Leaf cookbook

Last spring I fell in love with Steven Satterfield's recipe for roasted asparagus with green garlic and radishes, from his then-just-published cookbook Root to Leaf: A Southern Chef Cooks Through the Seasons. I haven't been able to find green garlic where I live in North Texas, so used regular garlic, Satterfield's suggested substitution. Simple and fabulous, the dish instantly became a regular player in my spring repertoire. Best of all, it's so easy to put together you don't even really need the recipe: Just cut the asparagus into 1 1/2-inch lengths, cut the radishes into quarters and toss both in a bowl with a little olive oil, finely chopped garlic, salt and pepper. Spread them on a baking sheet, baking dish or roasting pan and roast in a 400 degree oven till they're just tender, about 15 minutes. Want more specifics? Here's the adapted recipe:

Last weekend I fell in love again: With a technique for braising asparagus in butter I gleaned from a recent story and recipe in the New York Times by David Tanis. 

Butter-braised asparagus with herbs

The technique is brilliant: Place asparagus spears flat in a pan with a good deal of butter and a little water, salt and pepper; cover the pan and cook till the asparagus is just tender. Remove the asparagus and reduce the cooking liquid to nice sauce. Tanis adds lemon zest, lemon juice and chopped herbs, then garnishes the dish with herb leaves. It was super, though I had to tweak the recipe a bit (mine needed more liquid and longer in the pan; I added more water and a little more butter. I'll add an adapted recipe here once have time to retest it (watch this space!). In any case, butter-braising gives the asparagus a rich and luxurious silkiness and this too will become a go-to treatment chez moi. I love the lemon and herb flavors with it, but it should be great without them, too.

Meanwhile, in case you're wondering about the photo that leads off this post, that's a salad of shaved raw asparagus, sautéed asparagus and black lentils from Michael Anthony's V is for Vegetables, which just won a James Beard Foundation Book Award in the category of Vegetable Focused and Vegetarian. Again, this recipe needed some adjustments (more acid in the dressing, for one thing), but it's pretty swell, so I'll tweak and provide an adaptation soon! (I was wowed last fall by Anthony's cooking at Untitled at the Whitney Museum in New York City, so was excited to cook from his book). 

Asparagus with new-wave gribiche

Are you still with me? I want you to have all these asparagus ideas and recipes in one place. Another great way to serve asparagus is with sauce gribiche, whether the new-wave version shown in the photo above, or a slightly more traditional one. Just simmer the stalks in salted water, roast or grill them (as explained earlier in this post), and dress with the gribiche of your choice. Here's the new-wave gribiche recipe:

And here's an adaptation of Judy Rodger's four-minute egg gribiche from The Zuni Cafe Cookbook

Just one more direction, and it's a good one: Stir-fry asparagus Chinese-style. I wrote about this version adapted from Lucky Peach 101 Easy Asian Recipes in mid-February, when springtime was still a dream away.

I know you want the recipe. Here you go:

Now let's get cooking!


Artichoke vinaigrette: an easy, elegant, French (and vegan! and healthy! and make-ahead!) appetizer

Artichoke Vin edit.JPG

Growing up in California, I took fresh artichokes for granted. After all, Castroville – the town that bills itself as "the artichoke capital of the world" – is right there in the central coastal part of the state, not far from Monterey. I used to love stopping there on road trips and seeing the giant concrete artichoke sculpture that greets you at the edge of town.

In the spring and summertime, my mom always steamed artichokes and served them as an appetizer with melted butter to dip the leaves in. I love them even more dipped in mayo, or a mustardy red wine vinaigrette. Wylie loves it with balsamic vinaigrette.

A classic French way to serve artichokes is  à la vinaigrette – that is, actually dressed in the vinaigrette; shallot vinaigrette suits them particularly well. Pouring the sauce over them while they're still warm lets the vinaigrette penetrate the leaves – no additional dipping sauce required. An artichoke vinaigrette is also pretty beautiful. It's great as a sit-down starter at a dinner party or as a sharable treat before the dinner gets started. 

A few years ago, I served boiled artichokes as an appetizer to new friends in Texas, and was surprised that they found them exotic. "How do you eat them?" they asked. We showed them how to pull off a leaf, dip it in sauce, scrape off the meaty part (closest to the crown) with your teeth and discard the rest of the leaf. When all the leaves are gone and only the thin, prickly ones at the heart remain, you pull those off, scrape the fuzz off the crown with a spoon, and eat the heart  – the prize! – which is also delicious dipped in mayo or vinaigrette.


Many cooks boil artichokes rather than steaming them. I've prepared them both ways, and find that boiling them in plenty of salted water gives them the best texture. Acidulating the water with lemon juice (as some cooks do to prevent discoloration) is unnecessary; I find the results to be the same with unacidulated water. Instead, after I trim them, I simply rub the cut surfaces with half a lemon.

For a party of four to eight, I often make two artichokes and serve it with another app or two. For a dinner party, you can serve one per person, or for a more casual dinner, one for every two to share.

So, how to trim them? You can get all fancy, and remove the chokes if you want to, but I usually don't. 

Once you do it once or twice, it's easy. Using a sharp serrated knife, slice off the stem, creating a flat surface for the artichoke to rest on. Then slice off the top straight across – removing the tops of the inner few rows of leaves. Next use your fingers to break off the tough row or two of small leaves around the bottom.


Finally, use kitchen scissors to snip off any remaining leaf tips (be careful – there's a prickle at the top of each). Rub the cut surfaces with half a lemon and they're ready to cook.

Boil them in lots of salted water in a covered pot. Don't worry if they bob up to the top; flip them over with a spoon once or twice so they cook evenly. While they're cooking, whisk together the vinaigrette. 

Drain the artichokes upside down, then dress them with the vinaigrette. Voilá. Easy, chic, delicious and healthy. And there are a couple of bonuses: You can serve them warm, or make them ahead, serving them chilled or at room temperature. And . . . they're vegan!

Ready to try? Here you go!


How I learned to stop worrying about nixtamal and make fresh tortillas from masa harina

You can wrap just about anything in a freshly made corn tortilla, hot off the comal or griddle, and it'll be wonderful.

Well, that's a little bit of an exaggeration, but not much. 

In another lifetime, a hundred years ago when I was in my twenties and living in L.A., I made fresh tortillas all the time. I had a cheap aluminum tortilla press and a cheap aluminum comal (tortilla griddle); I'd picked up both in a Mexican grocery. You could buy a bag of masa harina (dried powdered masa) just about anywhere. I was in a serious carnitas phase: I'd fallen in love with Diana Kennedy's version in The Cuisines of Mexico, and I'd make that with salsa verde cruda and guacamole and a big pot of pinto beans to serve on the side. 

When I moved to New York to go to graduate school a few years later, I brought my comal and tortilla press and even my molcajete – though masa harina was not so easy to find.

The tortilla press I've had forever

A few years after that, some time in the early 90's, I lucked into an opportunity to meet Kennedy, and even spent a long weekend cooking with her and the late, wonderful Peter Kump, founder of Peter Kump's Cooking School in New York. My friend Danièle Mazet-Delpeuch (I wrote about her in my post about pissaladière) had invited Kennedy and Kump to her 500 year-old stone farmhouse in Dordogne to spend some days cooking and soaking up the delicious and gorgeous region. Danièle knew I was a huge Kennedy fan, and was wonderfully generous to invite me along.

At some point during a weekend spent making pommes sarladaise in a big pot suspended from the hearth in the center of Danièle's living room, and confit de carnard and chou farci and I can't remember what all else, Diana and I got into a discussion about corn tortillas. I'll never forget her expression when I told her I was in the habit of using masa harina to make mine: I might as well have told her I was a regular at Taco Bell. She was positively scandalized.  She insisted that masa made from nixtamal – corn kernels cooked in a solution of lime (calcium oxide) and water – was the only legitimate masa. I knew all about it from her book, but when I'd gotten to the part of the two-page process that said, "Meantime, crush the lime if it is in a lump, taking care that the dust does not get into your eyes," I stopped reading. 

With Diana, I tried to defend my position, arguing that tortillas freshly made from masa harina are way better than anything you can buy at the store. "Better to buy masa at a tortilleria in your neighborhood," she countered. But there were no tortillerias anywhere near my hood – the Upper West Side of Manhattan. It wasn't even easy to find masa harina there.  The conversation seriously deflated me (this was my Mexican cooking hero!) and I think I lost some of my joy for tortilla-making.

That's why last summer when a review copy of Alex Stupak and Jordana Rothman's cookbook Tacos: Recipes and Provocations landed on my desk at work, I was delighted when the book fell open to the following: "In Defense of Masa Harina." "A warm tortilla prepared with harina may not hit the same celestial notes as one made with fresh masa," it said, "but it is still an absolute revelation if all you've ever tasted is reheated, store-bought tortillas. There's irrefutable value in that, so I stand by it." 

Well, of course I've tasted many a fabulous tortilla made from fresh masa, but I still think the ones you make from masa harina (all you need to add is water!) are pretty darn good. And once you get the hang of it, making them is easy – easier than making pancakes, in fact, because the dough is just harina and water.


Though I'd already made tortillas a hundred times, I followed Stupak's instructions and found they worked perfectly, though I prefer the proportions of water to masa found on harina packages (1 1/8 cup warm water to 1 cup harina). You knead the water into the flour, roll it into a ball, and keep it moist under a damp towel while you work. "You want the texture to be as soft and moist as possible without sticking to your hands," is the way Stupak describes the right texture. 

 Set up a double griddle or two cast-iron pans and heat them so you have one side or pan hotter than the other. Line your tortilla press with plastic (so the dough doesn't stick). Roll some dough into a golf-ball-size ball. Open the press, plop in the ball, push down on the lever. Open the press, flip the tortilla onto your palm, peel off the plastic. (The thinner the plastic, the easier it is to peel off. I cut up thin, crinkly plastic bags like the ones you get at CVS if you forget to bring your own.) Drop the tortilla onto the cooler side of the griddle, cook for 15 seconds, then flip it over onto the hotter side and cook for 30 seconds. Flip it again (still on the hotter side) and leave it for 10 seconds, then flip a final time and cook 10 more seconds. At that point it may puff up a bit. Transfer it to an tortilla basket – or an insulated tortilla container (Stupak has a good section about which type is best – a "thick fabric tortilla warmer covered with culturally insensitive dancing chili peppers" was his favorite. He also explains why it doesn't work to reheat corn tortillas that have cooled completely.)

So, what shall we wrap these tender warm beauties around? That's a subject for my next post. Meanwhile, I can tell you what I put on the ones I whipped up tonight: Shredded store-bought roast chicken, diced avocado, white onion, cilantro, some leftover pinto beans, a squeeze of lime and a drizzle of leftover salsa borracha, also from Stupak's book. The salsa borracha – spiked with mezcal – was a revelation. That recipe's coming soon, too.

Meanwhile, in case you want to get some practice – or just have a fabulous vehicle in which to wrap leftovers (barbecue brisket is dreamy!) or do some creative taco improvisation – here's the corn tortilla recipe. Same thing I just gave you, but in a little more detail.


Hummus fans rejoice: Introducing an amazing, easy cheater version

I lied: I told you this post would be more about gribiche. But we need to interrupt our gribiche coverage to bring you breaking news on the hummus front: Cooks Without Borders has figured out how to make pretty amazing hummus from canned chick peas. 

No joke! 

If you're among those who caught hummus fever as chef Michael Solomonov's recipe for Israeli hummus tore up the internets last fall, or fell in love with Yotam Ottolenghi and Sami Tamimi's recipe in their brilliant cookbook Jerusalem (the excellent cooking blog Food 52 featured it a few years ago), you know how earth-shattering this is.

For those who are just catching up with it, here is the hummus situation in a garbanzo shell: Since time immemorial, creating hummus as smooth and fluffy as what you get in a great Lebanese, Israeli or other middle-Eastern restaurant involved soaking chick peas (aka garbanzo beans) overnight, simmering them for an hour and a half or two hours and removing their skins (can you imagine?!) before puréeing them. Sheesh! The brilliance of Ottolenghi's technique (which he apparently didn't invent, and which Solomonov also uses) is that it uses baking soda during the cooking process to soften the chick peas' skins so they don't need to be removed. 

Home cooks, meanwhile, who want to make a quick, easy hummus that's always at least as good as what you buy in a plastic tub at the supermarket, could simply purée chick peas in the food processor or blender with some garlic, lemon juice, tahini and salt, maybe a little olive oil. A hummus like that is fine, but never killer. It never has that amazing texture and deep flavor that a great one has.

I've been playing for the last few weeks with hummus made the Ottolenghi/Solomonov way, and I'll post about it when I'm ready to draw some conclusions. (There's more hummus to be made and tasted first!) But as I play, I can't help but wonder: Can we use this baking soda trick to radically improve the super-quick and easy version from canned garbanzos?

Yes, we can!

All you do is rinse the canned beans, simmer them for just five minutes in water and a little baking soda, and toss 'em in the food processor with some tahini sauce you've made while the garbanzos simmered. I found it pretty incredible that the skins could be softened enough to make a difference in just five minutes, but there you go. 

Was our cheater version as smooth as hummus made using dried-and-soaked garbanzos you simmer for an hour with baking soda? Well, if not, it was certainly close. It had been a week since I made a more involved one, but Thierry couldn't tell the difference: The cheater hummus was light, fluffy and soft, maybe more velvety than satiny. The flavor was very good, if not as extraordinary as the more involved way. It was terrific enough so that I'll certainly do it again if I'm pressed for time and want hummus. 

Want to try?

OK, toss whole garlic cloves (you can leave their skins on) in the food processor with salt and lemon juice. Purée briefly to chop the garlic, and let the mixture steep 10 minutes while you boil the garbanzos. Strain the solids from the lemon-garlic-salt juice, then put the juice back in the processor. Add tahini, pulse, then slowly pour in ice water through the tube as the motor runs. 

That gives you very light, lovely tahini sauce. Now add the garbanzos plus a little cumin (if you like that flavor), purée a couple minutes till very smooth, plate and garnish with olive oil and paprika – and more, if you like. I usually keep it simple, but you can get creative with parsley, whole garbanzo beans and such. 

Yippeee! Who says cheaters never prosper?

I think I can improve it still further flavor-wise (I'm going to play with adding more tahini, for instance). Once I have the very best version possible of the cheater hummus and the more involved hummus, we'll do a side-by-side taste-test. 

Meanwhile, I wanted to give you this recipe right away as it is very acceptable – way better than the stuff you'd buy in a tub.

Very good indeed with pita toasted or heated in the oven, and crudités. Who says cheaters never prosper?


A superfood salad (and more) for super-wonderful friends

Last night my friends Nicola and Habib came over to help me judge (and eat!) a couple of dishes I was testing for a cookbook review. 

The book I'll be reviewing (I'll try to post it next weekend) is Lidia's Mastering the Art of Italian Cuisine; Lidia would be Lidia Matticchio Bastianch – you may know her from her PBS show Lidia's Kitchen

You can't invite just anyone if you're testing a recipe for rabbit, but I had a feeling English-born Nicola and French-Tunisian Habib would be game (pun intended). And they were! The other recipe I tested was spaghetti alla carbonara. 


But hmmm – nothing green there. How to make sure my pals had their veg? Got it! We'd nosh on crudités while I was finishing up the cooking; I'd put them out with a red pepper-harissa dip I've been making and serving to friends for eons. I made the dip about an hour before they arrived and stuck it in the fridge so the flavors would come together. Here's the recipe:

And before we dug into the carbonara and rabbit, I'd give them a salad. I wanted something with some weight, and serious greens. Just the thing: baby kale with roasted sweet potato and pomegranate seeds. Should I put in some goat cheese? Nah – better idea: toasted pecans. I could toast a bunch and use them in both the salad and the dip. 

I'm not usually a huge fan of balsamic vinegar, but it's just right with the kale and sweet potatoes, and its depth balances the bright flavor of the pomegranates. And here's something really cool: All four of the salad's main ingredients are superfoods. A superfood salad for super friends! Please try it – and tell me if you like it as much as we did.