Taco party! Quick and snazzy ways to dress up freshly made corn tortillas

Now that you know how to make wonderful hand-made corn tortillas (just mix masa harina with water, and you're nearly there!), you'll want to wrap them around everything in sight. 

If you feel like really stretching out and cooking, you might prepare a special taco centerpiece, like lamb barbacoa or carnitas.

But maybe you want to go super-easy. Have a stress-free taco party! Here are some ideas for fillings:

•Pick up a rotisserie chicken at the supermarket 

•Stop by your favorite barbecue joint and buy some sliced brisket or pulled pork 

•Use that leftover steak in the fridge: Toss it in a hot skillet or grill pan, then slice it in medium-rare strips, for bifstek tacos. They're great dressed with chopped onion, cilantro and any kind of salsa.

•Boil up some pinto beans for vegetarian tacos. Just soak beans overnight, drain, cover with water, toss in half a peeled onion (or a whole one), a couple cloves of unpeeled garlic, fresh thyme or oregano (optional), dried or fresh bay leaves (optional). Bring to a boil, lower heat then simmer till they're tender. Add salt to taste when they're done.

•Pick up some shelled and deveined shrimp from the supermarket and toss them on the grill or grill-pan. Or grill fish fillets.

•Have some leftover confit duck legs burning a hole in your fridge? (Ha!) They make great tacos. I haven't tried them with salsa verde, but I'm thinking it would be great. Or you could go sweet and add a dab of chutney and some chopped cilantro.

•When Thanksgiving rolls around, consider leftover turkey tacos

•Leftover braised short ribs make great tacos,, too. So do leftover stews (beef, pork, lamb, veal, chicken), pot roast, chops, leg of lamb


Really, your imagination is the limit. In their book Tacos: Recipes and Provocations, Alex Stupak and Jordana Rothman have recipes for smoked salmon tacos (with cucumbers, cream cheese and lime) and pastrami tacos (with pickled mustard seeds and pickled cabbage).

More tips:

•Have a couple of good salsas on hand, like a roasted salsa verde (easy to make), a store-bought salsa roja or homemade pico de gallo (diced onion and tomato, chopped cilantro, minced serrano or jalapeño chile, a little salt, a big squeeze or three of lime). If you're feeling more ambitious, try Stupak's amazing salsa borracha


•Set out bowls of any or all of the following: lime wedges, guacamole, crumbled queso fresco, sliced avocado, cilantro leaves, sliced radishes, chopped olives, chopped white onion, sliced scallions, sliced or diced cucumber

Oh, one more thing: Do yourself a favor and hand your hands on one of these inexpensive ($8 to $12) insulated fabric taco warmers. Stupak and Rothman tested every type out there, and concluded these work the best. I have to agree: Mine kept our tortillas warm for at least an hour. Maybe they would have stayed warm longer; I don't know – we ate them all too fast. They're easy to find online; I lucked out when my generous friends Keven and Georges gave me one as a gift last weekend.


OK, then – let's invite some friends and get that tortilla press going! 


Crash course in Mexican cooking: lamb barbacoa tacos

Here's a project to attempt if you're in the mood for a major cooking endeavor. It involves some advance planning – scouting ingredients, a day or so of advance prep, a long, slow roast (three hours) and an hour letting the meat rest. You'll make a serious salsa, for which you'll roast dried chiles, spiked with mezcal, and create adobo, the brilliant paste that serves as a marinade for the lamb. You'll learn how to simulate pit-roasting in your oven. You'll make handmade corn tortillas. 

A lot of work – and time – to be sure. But it's really fun (if you're the type of person who loves to spend quality time in the kitchen), and when you're done, if you're not already adept at Mexican cooking techniques, when the project is done, you will be. 

And you will have something incredibly delicious to show for it. Invite your more gastronomically inclined friends, people who will truly appreciate it. It's the moment to break out that bottle of great mezcal you're been hoarding.

Lamb barbacoa – pit-roasted lamb – is a specialty of Oaxaca. I had a wonderful rendition recently in Mexico City, at El Cardenal in the historic district. So when I found a version in Alex Stupak and Jordana Rothman's new cookbook Tacos: Recipes and Provocations, I had to try it. Even if it meant chasing down ingredients in no less than four stores, two of them huge Mexican supermarkets. 

The most challenging was probably dried avocado leaves, which I found at one of the Mexican supermarkets (La Michoacana Meat Market in Richardson, Texas). I'm glad I bought three times the amount I needed, so I won't go through that next time. 

The two other challenges were fresh banana leaves, which I found easily at a Fiesta supermarket, and a boneless lamb shoulder. My local Whole Foods didn't have any kind of lamb shoulder; so I called Central Market (another well-stocked Dallas area supermarket) and the butcher was happy to bone one for me. I couldn't help but wonder, after making the dish, why it called for boneless. Maybe because it only called for two pounds? Still, my Dutch oven could have accommodated a larger piece of meat, and I would have been thrilled to have more barbacoa, so I think next time I'll try using a bone-in shoulder – or a piece of one.

So here's how the thing goes. The day before you're going to serve the tacos, make adobo. It's included in the main recipe. Five and a half hours or so before you want to make the tacos, take the lamb shoulder out of the fridge and let it come up to room temperature. Coat the roast in the adobo (very messy!).

Line a Dutch oven with banana leaves (this is explained more precisely in the recipe), then add a layer of avocado leaves:

Place the adobo-coated lamb shoulder on top . . . 

Cover it with more avocado leaves, then fold the ends of the banana leaves over it all and tuck them in.

Pour in a cup of water, cover the Dutch oven, and roast it slowly for three hours. After letting it rest at room temperature for an hour, unwrap the lamb, discard the banana and avocado leaves, skim the fat off the sauce and strain it, clean the Dutch oven, shred the meat and add it to the sauce. 

This is the moment when you know it was all worth it! The complex flavors go very deep. It's delicious.

Up for it? Here's the recipe:

You can eat the lamb barbacoa wrapped in freshly made corn tortillas, maybe dressed with guacamole (that's how I had it in Mexico City). Or you can go all the way and make Alex Stupak's lamb barbaco tacos. If you do that, you'll want to make salsa borracha sometime during the roasting process, or the day before. This is the part where you get to toast dried chiles and reconstitute them, grinding them up with other ingredients.

Aquí lo tiene:

You'll also need to prep the other stuff that goes in the tacos with the lamb: mince some white onion, chop green olives, slice some limes and cucumbers. 

Here's what you have to look forward to:

Awesome, right? Here's the recipe:

Let us know, in a comment, how it all goes! 


Bring on the eggs, hold the carbs: Introducing the best Caesar salad ever

I make a lot of Caesar salads, always have. I love them for their crunch, for their garlicky-anchovy-Parmesan wonderfulness. 

Wylie has loved them since he was a wee toddler, and I converted many of his childhood friends to salad eaters by persuading them to taste my Caesar. Not that it was so special – it was really a minimalist one. I never felt croutons were worth the effort or calories (unless my brother Johnny makes them; then they're totally and one hundred percent worth it!). So I do without croutons. And for eons, I've done without the traditional coddled egg – just because Caesar was my quick go-to starter, and who wanted to coddle an egg? 

But lately I've been thinking my Caesar could use an upgrade. No, not grilled chicken. (Horrors!) And I've never met a Caesar made with white anchovies I'd loved, so I'd stick with the salt-cured ones. In fact, very few futzed-with Caesars I've tasted have bettered a traditional one. 

Still, I kept thinking I could improve it. 

Got it! I'd bring back the egg, but instead of having one coddled egg that got so thoroughly mixed in no one would notice it, I'd use two gorgeously coddled eggs that you would very much notice, sort of broken into pieces so you could see and taste a just-starting to set golden gelatinous yolk here, a bit of white there. And I though a bit of lemon zest – an interloper, as it wasn't in the original Caesar recipe – would sing with the freshly grated Parmesan. 

CaesarBeforeMixing.jpg

I tossed it up, breaking up the egg but not completely. Garnished it with extra parm and lemon zest, a few extra grindings of fresh black pepper. Oh, baby – it turned out pretty great.


You might say it's not legit, as it does without the croutons. You can add some if you like. But in my world, the less white bread, the better, and I don't miss it. OK, here goes. I'm saying it officially here: This is my new Caesar. Try it! And tell us how you like it.

How I learned to stop worrying about nixtamal and make fresh tortillas from masa harina

You can wrap just about anything in a freshly made corn tortilla, hot off the comal or griddle, and it'll be wonderful.

Well, that's a little bit of an exaggeration, but not much. 

In another lifetime, a hundred years ago when I was in my twenties and living in L.A., I made fresh tortillas all the time. I had a cheap aluminum tortilla press and a cheap aluminum comal (tortilla griddle); I'd picked up both in a Mexican grocery. You could buy a bag of masa harina (dried powdered masa) just about anywhere. I was in a serious carnitas phase: I'd fallen in love with Diana Kennedy's version in The Cuisines of Mexico, and I'd make that with salsa verde cruda and guacamole and a big pot of pinto beans to serve on the side. 

When I moved to New York to go to graduate school a few years later, I brought my comal and tortilla press and even my molcajete – though masa harina was not so easy to find.

The tortilla press I've had forever

A few years after that, some time in the early 90's, I lucked into an opportunity to meet Kennedy, and even spent a long weekend cooking with her and the late, wonderful Peter Kump, founder of Peter Kump's Cooking School in New York. My friend Danièle Mazet-Delpeuch (I wrote about her in my post about pissaladière) had invited Kennedy and Kump to her 500 year-old stone farmhouse in Dordogne to spend some days cooking and soaking up the delicious and gorgeous region. Danièle knew I was a huge Kennedy fan, and was wonderfully generous to invite me along.

At some point during a weekend spent making pommes sarladaise in a big pot suspended from the hearth in the center of Danièle's living room, and confit de carnard and chou farci and I can't remember what all else, Diana and I got into a discussion about corn tortillas. I'll never forget her expression when I told her I was in the habit of using masa harina to make mine: I might as well have told her I was a regular at Taco Bell. She was positively scandalized.  She insisted that masa made from nixtamal – corn kernels cooked in a solution of lime (calcium oxide) and water – was the only legitimate masa. I knew all about it from her book, but when I'd gotten to the part of the two-page process that said, "Meantime, crush the lime if it is in a lump, taking care that the dust does not get into your eyes," I stopped reading. 

With Diana, I tried to defend my position, arguing that tortillas freshly made from masa harina are way better than anything you can buy at the store. "Better to buy masa at a tortilleria in your neighborhood," she countered. But there were no tortillerias anywhere near my hood – the Upper West Side of Manhattan. It wasn't even easy to find masa harina there.  The conversation seriously deflated me (this was my Mexican cooking hero!) and I think I lost some of my joy for tortilla-making.

That's why last summer when a review copy of Alex Stupak and Jordana Rothman's cookbook Tacos: Recipes and Provocations landed on my desk at work, I was delighted when the book fell open to the following: "In Defense of Masa Harina." "A warm tortilla prepared with harina may not hit the same celestial notes as one made with fresh masa," it said, "but it is still an absolute revelation if all you've ever tasted is reheated, store-bought tortillas. There's irrefutable value in that, so I stand by it." 

Well, of course I've tasted many a fabulous tortilla made from fresh masa, but I still think the ones you make from masa harina (all you need to add is water!) are pretty darn good. And once you get the hang of it, making them is easy – easier than making pancakes, in fact, because the dough is just harina and water.


Though I'd already made tortillas a hundred times, I followed Stupak's instructions and found they worked perfectly, though I prefer the proportions of water to masa found on harina packages (1 1/8 cup warm water to 1 cup harina). You knead the water into the flour, roll it into a ball, and keep it moist under a damp towel while you work. "You want the texture to be as soft and moist as possible without sticking to your hands," is the way Stupak describes the right texture. 

 Set up a double griddle or two cast-iron pans and heat them so you have one side or pan hotter than the other. Line your tortilla press with plastic (so the dough doesn't stick). Roll some dough into a golf-ball-size ball. Open the press, plop in the ball, push down on the lever. Open the press, flip the tortilla onto your palm, peel off the plastic. (The thinner the plastic, the easier it is to peel off. I cut up thin, crinkly plastic bags like the ones you get at CVS if you forget to bring your own.) Drop the tortilla onto the cooler side of the griddle, cook for 15 seconds, then flip it over onto the hotter side and cook for 30 seconds. Flip it again (still on the hotter side) and leave it for 10 seconds, then flip a final time and cook 10 more seconds. At that point it may puff up a bit. Transfer it to an tortilla basket – or an insulated tortilla container (Stupak has a good section about which type is best – a "thick fabric tortilla warmer covered with culturally insensitive dancing chili peppers" was his favorite. He also explains why it doesn't work to reheat corn tortillas that have cooled completely.)

So, what shall we wrap these tender warm beauties around? That's a subject for my next post. Meanwhile, I can tell you what I put on the ones I whipped up tonight: Shredded store-bought roast chicken, diced avocado, white onion, cilantro, some leftover pinto beans, a squeeze of lime and a drizzle of leftover salsa borracha, also from Stupak's book. The salsa borracha – spiked with mezcal – was a revelation. That recipe's coming soon, too.

Meanwhile, in case you want to get some practice – or just have a fabulous vehicle in which to wrap leftovers (barbecue brisket is dreamy!) or do some creative taco improvisation – here's the corn tortilla recipe. Same thing I just gave you, but in a little more detail.


Nothing says spring like strawberry-mezcal ice cream

I don't know what inspired this exactly. Except it's spring, so I'm jonesing for strawberries. And it's spring, so I'm jonesing for mezcal. A friend was coming to lunch last weekend, and I wanted to cook Mexican. But dessert . . . strawberry shortcake? Nah. A big ol' Pavlova smothered in strawberries and cream? Nah. Almond cake with strawberries? Nah. None of it felt right to follow the lamb barbacoa tacos I'd planned. 

But ice cream! Who makes strawberry ice cream, anyway? I would! 

I figured I'd roast my strawberries, as they weren't exactly peak-season Harry's Berries (the fabulous ones I'd buy at the farmers market if I happened to be in Santa Monica). Roasting the supermarket berries would concentrate their flavor a bit. For some reason, when I thought about roasting them, I thought of hitting them with a little mezcal. In the back of my mind, I was remembering a wonderful nieve de naranja (orange ice) con mezcal my friend Michalene and I had when we were in Mexico City in February, at a restaurant called Fonda Fina. "Aha" moment! I thought mezcal might work well with the brightness of the berries. 

And so it did! Making the custard base is always easier than it sounds; just take it slow. Best to do this the day before you want to serve it, so the ice cream can set up in the freezer overnight – or at least for a few hours. In any case, you want to have time to chill the custard before it goes into the ice cream maker.

Want to leave out the mezcal? Just substitute half a teaspoon of vanilla. Or a teaspoon of aged balsamic vinegar. I served the ice cream with a couple of (store-bought) almond crisps.

Want the recipe? Here you go . . . 

Gribiche, gribiche, gribiche: A different take on the sauce that jazzes up everything

Boiled shrimp with four-minute egg gribiche

Last month I wrote about a modern take on sauce gribiche, promising to follow up right away with more about gribiche. Forgive me – I got sidetracked by a startling hummus development

So, back to gribiche. I don't know how long gribiche has been around, but I do know August Escoffier gave a recipe for it in his 1903 Guide Culinaire. You've gotta love the way recipes were written then:

"Crush in a bowl the yolks of six hard-boiled eggs, and work them into a smooth paste, together with a large tablespoon of French mustard, the necessary salt, a little pepper, and make up the sauce with one pint of oil. Complete with two teaspoons of parsley, chervil, and tarragon (chopped and mixed), as many capers and gherkins, evenly mixed, and the hard-boiled whites of three eggs, cut in short, Julienne strips. This sauce is chiefly used with cold fish."

A few notes: First, this is the 1969 American English translation of the French; today it would no doubt say "Dijon mustard" rather than "French mustard." Second, I love the phrase "the necessary salt." Third, by "make up the sauce with one pint of oil," I'm pretty sure he meant whisk the olive in slowly, as in a mayonnaise – though I was surprised not to find vinegar or lemon juice in the recipe. "Gherkins": no doubt Escoffier was referring to cornichons. 

Anyway, the effect would have been like a chunky mayo – and that's what sauce gribiche meant for the better part of the century. (Excuse me while I geek out on culinary history; if I'm boring you, just skip down to the modern part!) 

Fast forward to The Zuni Cafe Cookbook, which the late great Judy Rodgers published in 2002. In it Rodgers included a recipe for Four-Minute Egg Gribiche. 

"This one is inspired by the mustardy gribiche the Troisgros brothers drizzled over beef carpaccio," she wrote, "and crowned with a pile of crispy hot fried potatoes, as an alternative to the familiar raw-egg steak tartar. " She goes on to describe the grillions of things you can do with it, from serving it with grilled fish or poultry to slathering it on sandwiches to putting it in potato salad.

Her version is much more like a mayonnaise than my modern take is. But it's much zingier, herbal and zesty than mayo, with wonderful texture.  Here's my adaptation of Rodgers' recipe:

It requires more a bit more concentration and technique than my easy modern version; you need to whisk all that olive oil in slowly so the sauce emulsifies (getting that mayonnaise consistency) and doesn't "break." But for some people it'll be worth it: Thierry loved it even more than he did my new-wave version. 

Roasted romanesco with four-minute egg gribiche

Roasted romanesco with four-minute egg gribiche

And if right about now you're thinking it would be fun to live with me because I cook, think again: I must have fed him gribiche twenty times that weekend! That day for lunch we had the gribiche three ways: with boiled shrimp (excellent); with boiled asparagus (wonderful) and with roasted slabs of romaneso (also very good!). Insanely weird all together: We had gribiche coming out of our ears! But that shrimp would be really nice as a main course for a Sunday lunch, or as a starter at a dinner party (the shrimp can be served warm or chilled). Or it would be great with cracked crab. Or roasted ham. Maybe even a roast tenderloin of beef. 

I'm not providing formal recipes for those very simple things, but happy to walk you through the three I made:

Roasted romanesco (feel free to substitute cauliflower): Slice the romanesco into slabs about 1/2-inch thick, place on a baking sheet, brush with olive oil, sprinkle on a little salt and pepper and roast in a 425 degree oven for about 20 minutes, or until just tender. Serve with sauce gribiche – the four-minute egg version or the new wave version

Boiled shrimp: Devein the shrimp, but leave the shells on. Drop them in court bouillon or boiling salted water and cook just thill they're pink and firm, about three minutes or so, depending on their size. Drain and serve. To make a quick court bouillon, fill a medium sauce pan about half way full with water, add a few glugs of white wine, half a sliced onion, a peeled and sliced carrot, salt, a few black peppercorns, celery leaves, thyme and parsley, bring to a boil, reduce heat and simmer 15 or 20 minutes. Don't worry if you're missing an herb or two. Serious people would tie the herbs and peppercorns in a bouquet garni, but I see no harm in the stuff floating around. To me it's easier to fish out the shrimp than look for the cheesecloth. 

Boiled asparagus: Trim the bottoms, and use a vegetable peeler to peel the asparagus to an inch or three below the tips. Simmer in a pan of salted water until the asparagus are floppy but still firm-ish, about four minutes for average-size asparagus – longer for jumbos and quicker for pencil-thin. Don't want to peel? Roast them instead: 17 minutes in a 400 degree oven, et voilà.

Best potato salad ever – thanks to new-wave gribiche


Oh: I almost forgot to mention. I had friends over for burgers last weekend, and made a batch of new-wave gribiche to see how it would do in a potato salad. Success! Here's an actual recipe:


Celebrate spring with a sugar-snap pea salad with lemon and parmesan

Spring is here – officially, anyway. In my hometown, Los Angeles, that means asparagus and fabulous strawberries and English peas, favas, nettles and morels. Where I live now, in North Texas, it means tornados and thunderstorms and hail. English peas? Not so much. 

I do find nice asparagus in the market, and good sugar snap peas – which I love to blanch lightly, slice up and toss in a lemony vinaigrette with snipped chives and grated parm. It was inspired by a salad I fell in love with a couple years ago over lunch with my girlfriend An-My at ABC Kitchen in New York. 

There's really not much to it. It takes a little while to slice up all the sugar snaps; after that, it comes together in a flash. I'm thinking it would be really nice served with frico, those lacy Italian parmesan crisps. (Remind me to scare up a recipe for them sometime soon!) 

Anyway, it's a lovely starter on its own.  Even if it's stormy outside, at your table it will feel like spring. Here's the recipe:

A new cookbook, 'Soup for Syria,' aims to help food relief efforts for Syrian refugees

Yesterday I was thrilled to find a review copy of a new cookbook, one that will appeal to just about every border-free cook I know, in my mailbox.  Soup for Syria: Recipes to Celebrate our Shared Humanity collects recipes by Alice Waters, Yotam Ottlenghi and Sami Tamini, Paula Wolfert, Claudia Roden, Mark Bittman, Greg Malouf, Anthony Bourdain and many more. All of them are for soup, and proceeds of the book go to the Soup for Syria project, a humanitarian campaign that aims to ease the suffering of 3.8 million refugees by delivering food and foodstuffs to refugee camps. 

A photograph of a girl in a refugee camp faces a recipe for gondi by Yotam Ottolenghi and Sami Tamimi

A photograph of a girl in a refugee camp faces a recipe for gondi by Yotam Ottolenghi and Sami Tamimi

Barbara Abdeni Massaad, a Beirut-based food writer and photographer, collected the recipes for the collection and photographed the people who are living in the camps. The project started when she was visiting a camp just 45 minutes from her home in the Bekaa Valley "where Syrian families crowd into plastic tents and children die of cold and hunger," as she writes in her introduction. "I try to sleep and ignore this reality, but it's impossible. I am not immune to the suffering of others."

The photos are beautiful; the people in them – particularly the children – are gorgeous. 

And the recipes, many of them simple, look wonderful. I've already put Post-its on a bunch I want to make (of course I'll share them with you once I do!). I have my eye on a recipe from Ottolenghi and Tamimi for Gondi, a Persian chicken soup with dumplings made from ground chicken and chickpea flour. Greg Malouf's recipe for fennel soup with lemon and cinnamon looks great, too. As does Paula Wolfert's recipe for lentil and Swiss chard soup (it's vegan!). Soup seems just the thing to cook for such a cause, as it's nourishing and nurturing.

Of course I'll share the soups with you once I make them, but thought you'd want to know about the project right away so you can help. The $30 book can be ordered through the Soup for Syria website.  The site also offers other ways to get involved in the cause, such as hosting a soup party where you can sell the book or take orders for it.


Hummus fans rejoice: Introducing an amazing, easy cheater version

I lied: I told you this post would be more about gribiche. But we need to interrupt our gribiche coverage to bring you breaking news on the hummus front: Cooks Without Borders has figured out how to make pretty amazing hummus from canned chick peas. 

No joke! 

If you're among those who caught hummus fever as chef Michael Solomonov's recipe for Israeli hummus tore up the internets last fall, or fell in love with Yotam Ottolenghi and Sami Tamimi's recipe in their brilliant cookbook Jerusalem (the excellent cooking blog Food 52 featured it a few years ago), you know how earth-shattering this is.

For those who are just catching up with it, here is the hummus situation in a garbanzo shell: Since time immemorial, creating hummus as smooth and fluffy as what you get in a great Lebanese, Israeli or other middle-Eastern restaurant involved soaking chick peas (aka garbanzo beans) overnight, simmering them for an hour and a half or two hours and removing their skins (can you imagine?!) before puréeing them. Sheesh! The brilliance of Ottolenghi's technique (which he apparently didn't invent, and which Solomonov also uses) is that it uses baking soda during the cooking process to soften the chick peas' skins so they don't need to be removed. 

Home cooks, meanwhile, who want to make a quick, easy hummus that's always at least as good as what you buy in a plastic tub at the supermarket, could simply purée chick peas in the food processor or blender with some garlic, lemon juice, tahini and salt, maybe a little olive oil. A hummus like that is fine, but never killer. It never has that amazing texture and deep flavor that a great one has.

I've been playing for the last few weeks with hummus made the Ottolenghi/Solomonov way, and I'll post about it when I'm ready to draw some conclusions. (There's more hummus to be made and tasted first!) But as I play, I can't help but wonder: Can we use this baking soda trick to radically improve the super-quick and easy version from canned garbanzos?

Yes, we can!

All you do is rinse the canned beans, simmer them for just five minutes in water and a little baking soda, and toss 'em in the food processor with some tahini sauce you've made while the garbanzos simmered. I found it pretty incredible that the skins could be softened enough to make a difference in just five minutes, but there you go. 

Was our cheater version as smooth as hummus made using dried-and-soaked garbanzos you simmer for an hour with baking soda? Well, if not, it was certainly close. It had been a week since I made a more involved one, but Thierry couldn't tell the difference: The cheater hummus was light, fluffy and soft, maybe more velvety than satiny. The flavor was very good, if not as extraordinary as the more involved way. It was terrific enough so that I'll certainly do it again if I'm pressed for time and want hummus. 

Want to try?

OK, toss whole garlic cloves (you can leave their skins on) in the food processor with salt and lemon juice. Purée briefly to chop the garlic, and let the mixture steep 10 minutes while you boil the garbanzos. Strain the solids from the lemon-garlic-salt juice, then put the juice back in the processor. Add tahini, pulse, then slowly pour in ice water through the tube as the motor runs. 

That gives you very light, lovely tahini sauce. Now add the garbanzos plus a little cumin (if you like that flavor), purée a couple minutes till very smooth, plate and garnish with olive oil and paprika – and more, if you like. I usually keep it simple, but you can get creative with parsley, whole garbanzo beans and such. 

Yippeee! Who says cheaters never prosper?

I think I can improve it still further flavor-wise (I'm going to play with adding more tahini, for instance). Once I have the very best version possible of the cheater hummus and the more involved hummus, we'll do a side-by-side taste-test. 

Meanwhile, I wanted to give you this recipe right away as it is very acceptable – way better than the stuff you'd buy in a tub.

Very good indeed with pita toasted or heated in the oven, and crudités. Who says cheaters never prosper?


Sauce gribiche makes every simple thing you cook instantly delicious

Seared barramundi with gribiche

How about an easy-to-make sauce that can turn the simplest grilled fish into a dazzling dinner party dish? Or that can dress up boiled or roasted asparagus? Or that you can add to sliced boiled potatoes to turn them into the snazziest potato salad ever?

That's the beauty of sauce gribiche: It can make every simple old thing deliciously new again. 

Poached leeks. Poached chicken. Boiled shrimp. Cold cracked crab. Fried or pan-fried soft shell crabs. Steamed mussels. Thick roasted slices of cauliflower. Sliced rare roast beef or lamb or ham. The possibilities are, you know, endless.

Traditional sauce gribiche is a mayonnaise made with hard-boiled egg yolks instead of raw ones, dressed up with herbs, capers and cornichons. (It's French, which is why it's called "sauce gribiche" instead of "gribiche sauce.") That old-style version is just as tedious to make as mayo, too, as you have to dribble in the oil while you constantly whisk, being careful not to let it "break." (Don't worry, though: Our new-wave version is super easy!)

The traditional style of gribiche bears little resemblance visually to the new-wave versions turning up in restaurants these days, though the ingredients are the same. The reason? Instead of whisking the ingredients into an emulsion, you quickly stir everything together. Using soft-boiled eggs instead of hard-boiled ones, and lots of herbs, brings it irresistibly into the 21st century in terms of looks and taste. 

Grilled jumbo asparagus with gribiche and bottarga from Gjelina: Cooking from Venice, California

I stumbled on one as I flipped through Gjelina: Cooking from Venice, California – the new book from chef Travis Lett. Lett uses it to sauce jumbo asparagus that he first parboils, then grills; the dish is finished with lots of grated bottarga, dried cured mullet roe. I love bottarga, and I happened to have some in my fridge, so I made it – and loved it. (Note: in case you happen to make it, boil the asparagus longer than he tells you, or it will be crunchy-hard. Also, I substituted panko for the garlic crouton crumbs that added a bunch of extra steps to his recipe, and the panko worked great.) But bottarga is hard to come by, and it's expensive, so before I added it to the dish, I tasted it without. Good, but not great. It wanted a little more zing. I decided to develop a recipe that would be zingy enough to jazz up simple, plain food without the help of bottarga. 

I pretty quickly hit upon the answer: cornichons. Traditional gribiches include them, yet Gjelina's did without them (probably they would taste weird with the bottarga). Adding them did the trick: It was much more vibrant. I made a batch and tried that on asparagus I cooked simmered in salted water till tender:

Asparagus with new-wave gribiche

Bingo! This was perfect! I also used it to sauce barramundi, a delicately flavored fish with nice body. I did nothing fancier than put salt and freshly ground black pepper on the fish, and seared it gently in a little olive oil. Wow – it was really good, something I'd happily serve at a dinner party. 

Want to try it? Here's the recipe:

Seared barramundi with new-wave sauce gribiche

I didn't stop there. I also found a version in one of my all-time favorite cookbooks, Judy Rodgers' The Zuni Cafe Cookbook. I'll tell you about that – and more about gribiche – in my next post!


Brazilian chocolate cake: Really, it doesn't get any better than this

I can't remember the first time I tasted the Brazilian chocolate cake from Deborah Madison's The Greens Cookbook, but I do remember who made it: my friend Michalene. (She's also the genius who asked the gobsmacking question about whether I'd tried the magic lacquered chicken technique with duck. Now I have! It is going to work! I am developing it! Stay tuned!) But the cake. It doesn't look like the photo above once it's finished; what's pictured is the bottom half of the cake after I iced it with ganache. It just looks so luscious, I couldn't resist. Wanted you to keep reading. Forgive me. This is what it looks like when it's finished:

I know, not as glam. I'm not much of a baker; yours will probably be more beautiful. Michalene's always is. Also it is not easy to photograph a bundt cake.

However – and this is a big however – I've made the Brazilian chocolate cake a jillion times, and every single time it has turned out great: moist, with a lovely, fine crumb, rich and magnificently chocolatey. Not too sweet. 

It is, quite simply, the perfect chocolate cake. When you slice it, you can see a stripe of that fabulous glossy bittersweet ganache in the middle, exactly the right amount. It is the little black dress of chocolate cakes: simple, elegant, necessary. It may look a little austere, but oh, baby, it is anything but. A cup of strong coffee in the batter gives it depth and dimension. 

Otherwise, there's nothing unusual about the recipe, which as far as I can tell is foolproof. When I last made it, a few days ago, I purposely fooled with the recipe. I used pastry flour instead of cake flour. I used room-temperature coffee instead of hot coffee. I used a 3.5 ounce bar of chocolate instead of the 3 ounces the cake part of the recipe calls for; same for the ganache. Both cake and ganache were perfect. 

I wish I had a slice right now. Thierry, Wylie and I polished it off pretty quickly. It is not only dreamy as a dessert, it's amazing the next morning (and the one after that) for a decadent breakfast. Wylie was home for spring break when I made it. Though he has never been a big fan of cake, he loves this one.

And you will, too.  Here's the recipe:

Fried rice SMACKDOWN! Lucky Peach vs. Mission Chinese Food - Round Two (Mission Chinese Food)

After gorging myself on the superb Chinese Sausage Fried Rice from Lucky Peach 101 Easy Asian Recipes, I rolled up my sleeves the very next evening, put on my apron and pulled out the wok. Time for round two of the smackdown! 

First I made rice – Danny Bowien rejects using day-old rice as an old wive's tale. "How could old rice be better?!" he writes. "Come on. Use fresh warm rice, not a hard puck of cold rice." His recipe calls for 3 cups of rice, "from about 1 1/2 cups raw." Well, 1 1/2 cups raw yielded more than 5 cups; 1 1/4 cups yields more than 3 cups. Just to let you know in case you don't want to waste rice.

Then the prep: I sliced Chinese sausage, iceberg lettuce and scallions (no need to separate the whites and greens on this one), scrambled eggs and chopped cilantro. No need to mince garlic or ginger for this one, which is a plus.  

The salt cod had already been fried (though I neglected to give it a whirr in the food processor – no matter, the pieces were pretty small) and the mackerel confit drained.

Then I made what Bowien calls a rice stack: The rice goes in a bowl with the fried salt cod on top of it and the sausage on top of that. "You want the ingredients to hit the wok in reverse order," he explains, "sausage, fish, rice  – and the stack facilitates this."

Then, in a bowl big enough to toss the whole dish after the rice cooks, I combined the lettuce, cilantro and scallions. 

Then it was showtime! Blazing heat went under the wok and a few "heathy glugs" of oil went in. When it was nearly smoking, I pulled the wok off heat and scrambled the egg together with the mackerel very quickly, just 10 seconds or so and dumping them on a plate. Back on the heat went the wok with a little more oil and in went the rice stack. Bowien's description of how to fry it is clear and easy to follow: "Gently break up the stack and use the spatula to press the rice against the bottom and sides of the hot wok. Wait 10 seconds, then flip and stir the rice. Flatten and press again, and wait 10 seconds. Flip and flatten a last time." 

At that point you season the rice with salt, sugar and fish sauce, give it a stir, add the eggs and mackerel, stir again. Then scoop everything out of the wok and into the big bowl, where it gets tossed with the lettuce, cilantro and scallions. 

Masterpiece finished! 

For the second evening in a row, I was bowled over: This was stupendous.

Honestly, I can hardly believe that a civilian (me!) can make fried rice this good. The previous night, my friend Carol, a self-described rice fanantic who happens to be Italian, had come over to share the Lucky Peach rice with me. But now, with Thierry away in France, I found myself alone with an entire batch of Mission Chinese Food Salt Cod Fried Rice. I'm embarrassed to tell you how much of it I ate all by myself.

OK, Let's just say most of it. Here is the recipe:

So, how do the two fried rices stack up?

Judging the smackdown

Deliciousness: The Mission Chinese Food Salt Cod Fried Rice was more luscious than the Lucky Peach Chinese Sausage Fried Rice, with bits of crunchy fish adding textural interest and serious umami; the Lucky Peach rice was a little drier, more like the classic good-bad Chinese food pork fried rice (PFR) I so fondly remember from childhood (down to the frozen peas), but with Chinese sausage in place of barbecue pork. Both had plenty of fluffy, moist egg. Of course the Mission Chinese entry involved Chinese sausage too, and even more of it; that one was more chock-a-block full of stuff – a bit more egg, plus the two kinds of fish. Both were truly delicious; both were perfectly seasoned. Minced garlic and ginger brought tasty dimension to the Lucky Peach rice, but I didn't miss them in the Mission Chinese Food rice, with all that fish-umami happening, plus the cilantro. The Mission Chinese Food fried rice was maybe just a little more strikingly fabulous. But I would happily eat a giant bowl of either one any day of the week. 

Mission Chinese Food Salt Cod Fried Rice Deliciousness: 10/10

Lucky Peach Chinese Sausage Fried Rice Deliciousness: 9/10

Ease of preparation: No question, the Lucky Peach recipe was much simpler to prepare. Other than cooking the rice in advance, everything was prepped and cooked in about 20 minutes. The Mission Chinese Food recipe was extremely involved, thanks to soaking/water changing then frying and food processing the salt cod, and making the mackerel confit. While I loved eating the mackerel confit on its own (and will definitely make it again), it got a little lost in the rice. Did it add much to the whole? Hard to say. Neither recipe needed significant tweaking (the only issue in either was how much raw rice yields 3 cups cooked in the Mission Chinese recipe, which is really minor); both were clearly explained and very easy to follow – even with the hot wok going. 

Mission Chinese Food Salt Cod Fried Rice Ease of Preparation: 6/10

Lucky Peach Chinese Sausage Fried Rice Ease of Preparation: 9/10

All-around awesomeness and wow factor: Both rate very highly. A steaming bowl of hot fried rice with fluffy egg and chewy, smoky Chinese sausage, excellent texture and flavor that you made yourself in your very own wok is terribly exciting and fabulous.

When Wylie came home for spring break and Thierry returned from France a couple days later, it was the first thing I made them. More on that later. After Wylie goes back to school, I'm thinking a batch of the Lucky Peach rice would be an absolutely dreamy thing to eat when Thierry and I are hunkered down in front of the TV to binge watch House of Cards or election returns. Will I ever make the Mission Chinese Food recipe again? Perhaps. But only if guests who really geek out over Chinese cooking come over. (Sherry and Fred: You are wanted in Dallas!) Otherwise, the Lucky Peach's simplicity-in-preparation quotient makes up for its slight fabulousness deficit in relation to the Mission Chinese Food recipe, creating – ladies and gentlemen – an all-around awesomeness dead heat.

Mission Chinese Food Salt Cod Fried Rice Awesomeness and Wow Factor: 9/10

Lucky Peach Chinese Sausage Fried Rice Awesomeness and Wow Factor: 9/10

Well, after all that, you might think I've had enough fried rice for the time being. You'd be wrong. Now I am consumed with creating the perfect fried rice recipe: one the marries maximum awesomeness and deliciousness with the minimum of effort and time. Interested? Be sure to check back soon!

Fried Rice SMACKDOWN! Lucky Peach vs. Mission Chinese Food - Round One (Lucky Peach)

It's the event of the season, the match-up we've all been waiting for: enticing fried rice recipes from two hot new Asian cookbooks. On the left is the Chinese Sausage Fried Rice from Lucky Peach 101 Easy Asian Recipes by Peter Meehan and the editors of Lucky Peach. On the right is Salt Cod Fried Rice from The Mission Chinese Food Cookbook by Danny Bowien and Chris Ying. 

The Mission Chinese Food fried rice has a cult following and takes more than 24 hours of advance preparation – after a dedicated hunt for ingredients. You'll be required to soak salt cod in several changes of water for 24 hours, make mackerel confit in advance and fry-up the salt cod till it's hard as jerky, then shred it in a food processor. before you start. Are you up to it?

Meehan's recipe is the underdog, with no restaurant pedigree – though Lucky Peach magazine certainly has a cult following. You can put the whole thing together in a half hour, though unlike its opponent, it prefers (though doesn't require) that you use day-old cooked rice.

Both include Chinese sausage, scrambled eggs and scallions, and neither relies on soy sauce, which makes things interesting.

Mission Chinese Food Cookbook's Salt Cod Fried Rice

We'll be judging the fried rice contenders in several areas:

–Taste: how delicious is it?

–Ease of preparation: Is it worth the time and effort?

–All-around awesomeness and wow factor

It's going to be a tough contest, and we have quite a bit of prep ahead of us, so let's get going!

Both require a trip to the Asian supermarket, though the Lucky Peach recipe offers substitutions if you can't come up with things like Chinese sausage (use bacon or pancetta), Shaoxing wine (dry sherry will do) and fish sauce (use soy sauce). For the purpose of this smackdown, I used the Chinese preferred ingredients. If you're thinking of making the Mission Chinese Food fried rice and you don't have access to salt cod, fresh or frozen mackerel fillets, Chinese sausage and fish sauce, just fuggedaboudit. Make the Lucky Peach recipe and call it a day.

Are you ready? 

After gathering all the ingredients, I started two days in advance, cooking jasmine rice beforehand for the Lucky Peach recipe. For the Mission Chinese Food recipe, I submerged the salt cod in cold water.  

A little background on the Mission Chinese Food recipe. "The spirit animal of this dish is the fried rice with salt fish and chicken at R&G Lounge in San Francisco," writes Danny Bowien, the Mission Chinese Food chef. (Wow – that was the site of one of my greatest food memories ever – a Chinese banquet ordered by Melanie Wong, one of the first friends I ever "met" online.) Bowien then riffs on the umami wonderfulness of salt cod: "I love the way it seasons and perfumes rice with a funky, fermented flavor. But I don't particularly love biting into a gnarly chunk of it. The aim of our Salt Cod Fried Rice was to capture that pleasant fishiness without the stank." His solution for his restaurant was to shred salt cod, then fry it. But customers complained there was no visible fish, "so we gilded the lily with chunks of rich mackerel confit."

OK, then – I went to work preparing the mackerel confit, which involved first filleting the mackerel I found in the Asian market. It seemed a little ridiculous to me, but it was really easy and actually quite wonderful.

Mackerel confit

All you do is cover mackerel in vegetable or peanut oil in a saucepan and put it in a 300-degree oven for 25 minutes. Let it cool in the oil, then flake the fish into small chunks and either use it right away or cover it with the oil in a jar and store it in the fridge up to a week. It has a wonderful soft texture and lovely, lightly salty (though no salt was added), delicately fishy flavor, like a cheffy version of canned tuna. The fillet I had yielded more than the 4 ounces the recipe called for, so I'd have to think of a use for the rest of it (an amped-up mackerel-salad sandwich, maybe?). Anyway, it made me feel like confiting every oily fish I can get my hands on.

OK, first up: The Lucky Peach Chinese Sausage Fried Rice. 

As in all Chinese cooking, you definitely want to prep all your ingredients in advance, have them ready and all measured out – your mise en place. The book actually uses a master fried rice recipe, which is great, as it teaches you the technique.

To prep, I sliced Chinese sausage, measured out some frozen peas, whisked together a sauce (Shaoxing wine, fish sauce, sugar and sesame oil), beat two eggs, chopped garlic and ginger and sliced scallions. That was pretty much it – 20 minutes max. 

The recipe calls for 3 cups of cooked long-grain rice, which you can get by cooking about 1 1/4 cups of raw rice. You put the rice in a bowl, break up the clumps with your fingers and make sure your mise is next to the stove. 

First you get your wok very hot, cook the eggs very quickly in a little oil and get them out of the pan. Add more oil, then add garlic, ginger and scallion whites (we kept white and green parts separate), cook just a few seconds, add the peas and sausage, and cook just till heated through. 

Now's the fun part. Dump the rice into the wok, toss it to mix, and use a spatula to spread the rice up against the sides and bottom of the wok, maximizing contact.

"Stir and fold once a minute" for 3 minutes, till the rice is hot and "a little charred in spots." Now pour on the sauce, toss it and continue the spreading, searing, tossing routine "until the rice is evenly colored and looks pleasantly dry." Now add the eggs back in, chopping them up and toss in the scallion greens. 

Ding-ding-ding! Finished!

Oh, man . . . heavenly! The egg is tender, and the dish is perfectly balanced, absolutely satisfying and fun. And it's big fun to make – I can't wait to do it again. Here's the recipe:

Next it'll be Mission Chinese Food's turn. Stay tuned for Fried Rice SMACKDOWN Round Two!


The Chinese lacquered roast chicken that changed my life

Now and then, a recipe comes along that feels truly life-changing. The short crust pastry for the lemon-raspberry tart I wrote about earlier this week was one for me. It wasn't a new recipe when I discovered it a few years ago – it had been right under my nose in the Chez Panisse Desserts cookbook forever, but it was new to me when my friend Michalene pointed me to it. Today it's my go-to recipe for tart crust.

Now a Chinese lacquered roast chicken has changed my life.

There's nothing more delicious than roast chicken, and every cook should have a favorite recipe for it (at least one!) in his or her repertoire. For years, my go-to roast chicken has been the Judy bird – that is the Zuni Roast Chicken from Judy Rodger's The Zuni Cafe Cookbook. It's the spectacularly flavorful, crisp-skinned chicken you have swooned over if you've ever gone to San Francisco's Zuni Cafe and ordered roast chicken for two. I will write about the Zuni chicken soon here on the blog and give the recipe, but the technique is basically this: Tuck fresh herbs under the chicken's skin, rub it all over with a lot of kosher salt, and let it sit in the fridge like that for one or two days. When you're ready to roast, wipe the chicken dry, heat a skillet on the stove, plop in the chicken, transfer it immediately to a very hot oven, and let it roast. No basting, but you  have to flip the chicken a couple times and fiddle with temperature. It always results in a fabulous bird.

When I don't plan ahead, I've used the Judy technique without the advance salting, and sometimes even without tucking herbs under the skin. It's still always excellent. I thought my abbreviated version was the simplest great roast chicken possible without a rotisserie.

So when I read about author Peter Meehan's roast chicken approach in the new cookbook Lucky Peach Presents 101 Easy Asian Recipes, I sat up and took note. "We are advocates of a hot-and-lazy approach: one high temperature, one pan, one position, one great result." He talked about how seasoning a bird ahead of time and letting it sit uncovered in the fridge lets him have an easy dinner to pop in the oven anytime in the next three days, and now I was really sitting up straight. This man is sensible! When he wrote, "I started doing this after I fell under the spell of Judy Rodger's Zuni Cafe Cookbook," I dropped the book and ran out to buy a chicken. Invoking Judy's name confers instant credibility.

In the Lucky Peach Presents 101 Easy Asian Recipes cookbook, Meehan offers three roast chicken recipes. For me, it was a no-brainer: Lacquered Roast Chicken.

Irresistible, right?

Here's the deal. This is the easiest roast chicken recipe in the universe, and the result is magnificent. 

All you do is this: Paint a chicken with a mixture of half-honey, half soy sauce, then sprinkle it with salt. Let it sit uncovered in the fridge for one or two days, then roast it in a 400 degree F. oven for 50 minutes. That's it. No basting, no flipping, no lowering and raising temperatures. Let it rest 15 minutes, then carve it and here's what you get:

I kid you not. The skin was wonderfully crisp, the meat super-flavorful and both dark meat and white meat were perfectly cooked. The white meat was moist, juicy and delicious as the dark meat. A miracle!  I can't wait to try it again.

Here's the recipe:

Want something smashing this weekend? Pick up a chicken tonight or tomorrow, paint it with lacquer and it'll be ready to pop in the oven Friday or Saturday evening. Or paint a bird with the lacquer on Sunday afternoon and leave it in the fridge so you can roast it for an easy weeknight dinner next week. And please let us know – in a comment here – how you love it!

Meanwhile, I told Michalene about it, and what she said glued me to the ceiling: "Have you tried it on a duck?" Oh, man.

NOTE: I later made the chicken again, and it required ten minutes longer to cook – about an hour total roasting time. When it's done, the skin will be mahogany, and the legs will wiggle freely at the joints "like you could almost tear them off," as Meehan writes. The internal temperature should be 165 degrees F at the thickest part of the breast and where the thigh meets the breast. Also, when you're preparing the bird, don't worry if some of the glaze falls off the bird – it doesn't matter. That's why we have foil lining the pan.

Ta-da! Presenting a custom-created, Cooks-Without-Borders reader-asked-for-it lemon-raspberry tart

So I'm pretty excited about this: A reader who signed up for the Cooks Without Borders newsletter mentioned that she's craving a lemon-raspberry tart and would love a recipe. Hmm, I thought. That does sound awesome! Especially this time of year. 

I didn't know how I would make one, but I decided to give it my best. I knew what crust I'd use: Lindsey Shere's amazing short crust pastry from the Chez Panisse Desserts cookbook. It's foolproof, easy to put together (even if it seems kind of crazy while you're doing it), doesn't require rolling pin skills (you press it in the pan with your fingers) and results in an incredibly tender and flaky crust. 

I thought it would be nice to marry a classic lemon tart – filled will lemon curd – with raspberries somehow. But simply garnishing a lemon curd tart with raw raspberries didn't sound great. I could create a raspberry tart with lemon pastry cream, but pastry cream is a pain in the neck; lemon curd is easier and more forgiving. 

I found inspiration in Shere's recipe for a simple raspberry tart. She has you brush a prebaked tart shell with melted, strained raspberry preserves, line the shell with rows of berries, bake it for only five minutes, and then glaze it. Why bake the berries only five minutes? "This brings out the perfume of the raspberries without softening and making them mushy," she writes. Bingo! I'd make a lemon-curd tart, pull it out of the oven five minutes early, add just a couple rows of berries (so as not to overwhelm the lemon flavor with too much berry flavor), bake it five minutes more, then glaze the berries.

It turned out great! Two pals and I nearly polished off the whole thing, in any case – after eating a giant dinner. My raspberries were sort of dull-tasting supermarket berries, but treating them this way heightened their flavor. 

Are you up for it? Here we go!


First we make the crust. Don't be afraid: It's easier than you may think, and every time you make one it gets easier and easier. (Believe me: I'm not much of a baker, and I can manage it!). It's such a great crust that if there's one thing you want to learn dessert-wise, this crust might well be it. It's that good. 

To make it, whisk flour, salt and sugar together in a bowl, add sliced chilled butter and work in the butter with your fingers or a pastry blender until it looks like this:

Add vanilla and water, gather it into a ball, let it rest 30 minutes, then use your fingers to press it into a tart pan. It may look at first like you won't have nearly enough dough to cover the pan, but you do – just keep pushing it around with your fingers until you have an even layer covering the bottom and sides.


Stick it in the freezer for a half an hour, then it's ready to bake: in a 375 degree oven for 25 minutes, or until it's golden-brown and baked through. Got it? Here's the recipe:

Now let's make the lemon curd. Again, this may sound scary, but it comes together really nicely – and it has beautiful, bright lemon flavor.

Basically you cook eggs, sugar, lemon juice, lemon zest, milk and butter – stirring constantly – over low to medium heat until the mixture thickens to the consistency of a thick cream. Let it rest five minutes, give it a quick whisk, then chill it. Once it has cooled down, pour it into the baked tart shell.

Bake it in a 375 degree oven for 25 minutes, pull it out (leaving the oven on), add a couple of rows of berries, and pop the tart back in the oven for 5 minutes longer. Remove it from the oven, melt some strained raspberry preserves, stir in a little kirsch, and glaze the berries. Tart accompli! Shall we do this? Here's the recipe. Please let us know in a comment if you plan to try it – and if you do, how it turns out!


Dreaming of spring, I cook – and eat – an entire bunch of stir-fried asparagus

My friends will tell you I'm a little bit crazy. 

OK, maybe more than a little. This day and evening are a case in point. At 8 a.m. I was at my home computer, fiddling with a story I was trying to post online for work. I made coffee. I launched into writing a review, fearing I'd be late for my noon deadline. At some point I made a salad (with Thousand Island dressing, which I deserved, as I was on deadline) and then at three thirty or four I filed, apologizing profusely to everyone involved. Caught up with emails. Jumped into another story I'm writing, this one for Palate magazine, which I'm editing and which has to be completely finished a week from today. (Insane!)

After a while, I looked at my watch and was stunned that it was 7:30. I got up from my desk and turned lights on in the other rooms. Thierry was out, and the house was empty. What would I do for dinner? Some people might just make some pasta or something else they had around, but I wanted something green. I've been craving asparagus. And I'd been eyeing a new cookbook I thought would be fun to review: Lucky Peach 101 Easy Asian Recipes. I flipped through to see if there was a recipe involving asparagus. Bingo! Stir-fried asparagus! I got in the car and headed to the market to buy a bunch.

Oh, but wait – as long as I was headed to the store, maybe I should see if there was something else I wanted to make. I went back inside. Flipping through the book again, I landed on something irresistible: lacquered roast chicken. "Lacquered" is like a magic word for me, no way not to succumb. Further, this looks like the easiest roast chicken recipe in maybe all of history. Four ingredients, including salt (a bird, some honey and soy sauce). You paint the bird with half-honey, half-soy, sprinkle with salt. Let it sit, uncovered in the fridge, 12 hours to 2 days. Pop it in the oven, roast 50 minutes, let rest 15, and carve. Had to try! 

Bought the chicken, bought the asparagus. The recipe called for one large bunch. Drove back home.

Stir-frying asparagus


I brought a large pot of water to a boil, added salt, dropped in cut-up veg, blanched briefly and drained. Heated oil in the wok, added garlic, then asparagus, then chopped Thai chiles, and stir-fried. Then oyster sauce, sugar, white pepper. Stir-fried. Then chicken stock, and cooked till sauce thickened a little.

"Serve on a large platter," it said, and so I did. It should have said a small platter – not a whole lot of asparagus here. The recipe said it made four servings, but I'd say two or three. OK, maybe my bunch of asparagus wasn't that big, but it was the biggest one I saw. 

I took a few picture of it, then sat at the table, poured a glass of white wine, pulled out some chopsticks, and ate the asparagus. All of it. It was very good. Try it. See for yourself.

But wait. There was more: the chicken. Spring chicken! I mixed together two tablespoons of honey and two tablespoons of soy sauce, then painted a thin, even layer on the chicken. Set the time for 15 minutes, during which I did the dishes. Ding! I painted the chicken with the rest of the marinade, then sprinkled it with two teaspoons of kosher salt and put it in the fridge, uncovered. Tomorrow or Saturday (who can think that far ahead!?) I'll zip it into the oven. 

To all a good night.


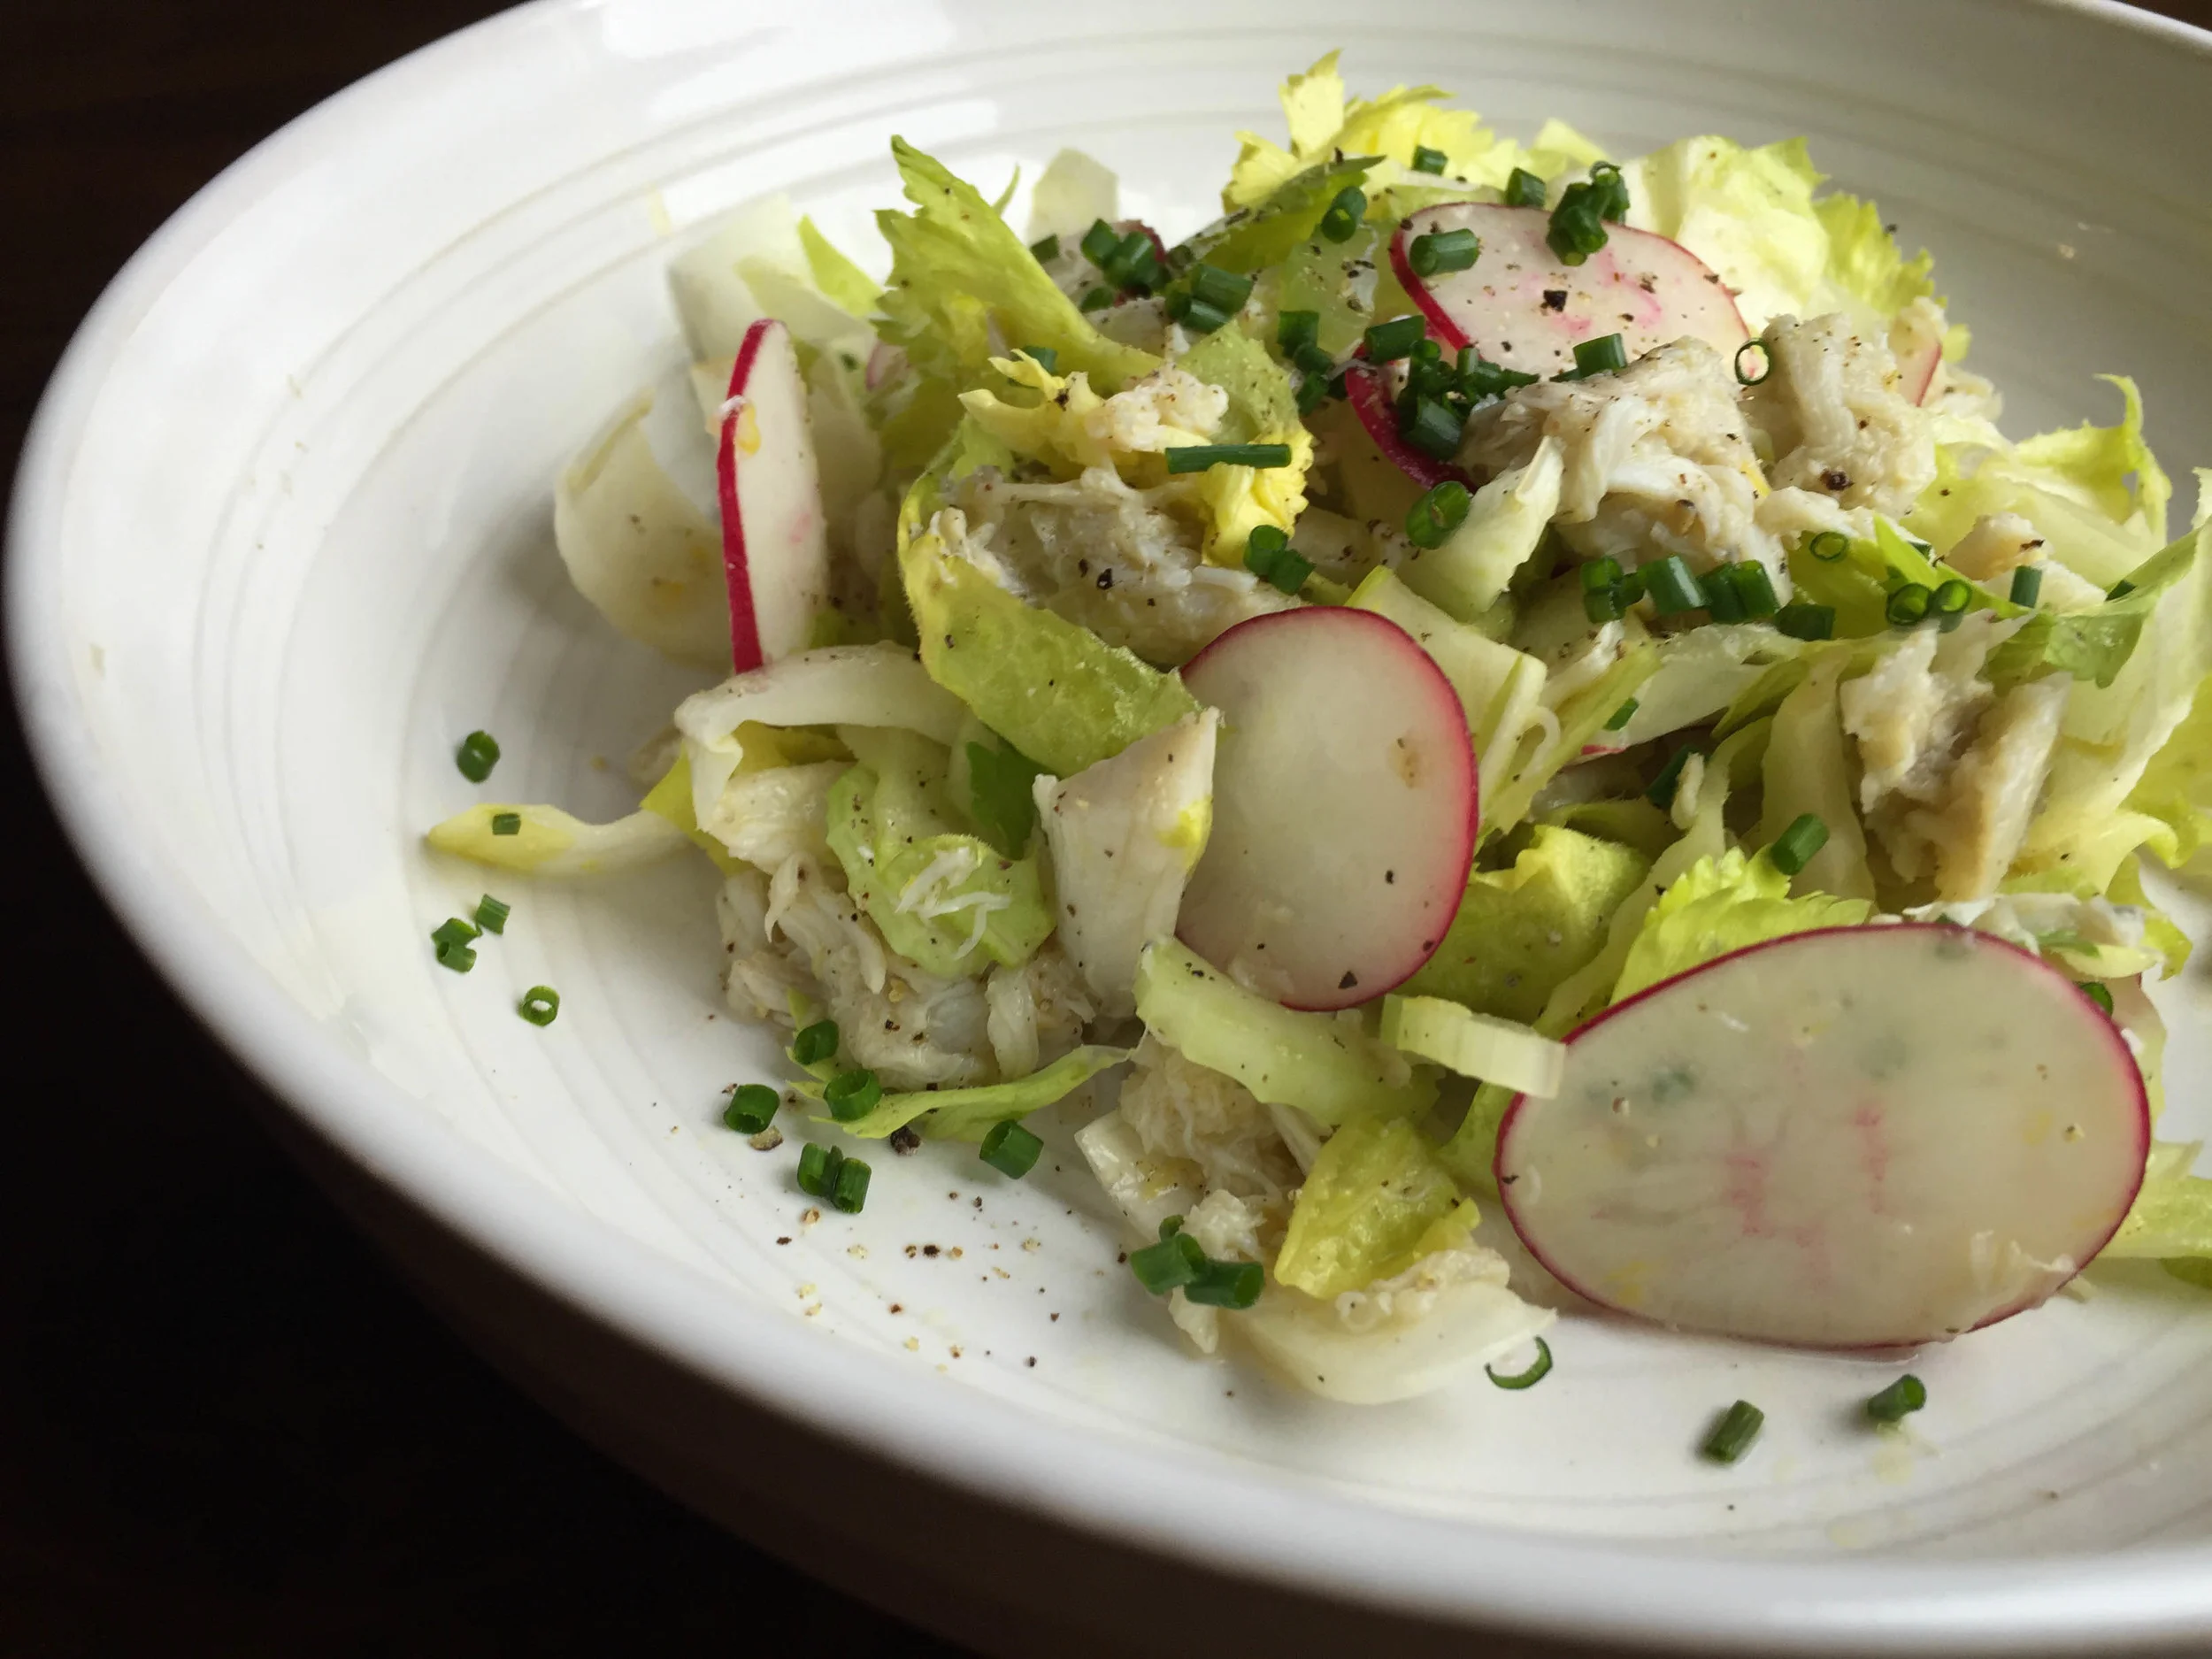
Celery, endive and crab salad: a delicious way into a winter dinner party or Valentine's dinner for two

Celery, endive and crab salad

You're having friends over. You've planned your main course, and the nibbles over drinks for starters, and the dessert. But what, oh what, should you start with when everyone sits at the table? 

This time of year, it often comes down like this: For a main course, I'm making something rich or hearty – like a stew or braised meat or poultry, or a roast of some kind.  So to start, I want something light, but not inconsequential. It would be lovely if it could involve greens. A winter salad? 

This salad of celery, Belgian endives and radishes – with crab meat for a bit of luxury and lemony dressing to keep it fresh – is elegant, pretty and fresh: just the ticket. 

You can slice the radishes and celery in advance, so the salad comes together in no time flat when you're ready to dine. 

Or maybe you're cooking a Valentine's dinner for your sweetie? Make half a recipe, and serve it – with a glass of crisp Sauvignon Blanc (maybe Sancerre!) – as a prelude to a steak or roast chicken. Sound good? Let's do it!


Super bowl of soup: black bean with roasty veg

Black bean soup vegetables

There's nothing more warming and comforting on a chilly winter evening – or a kicked-back Super Bowl Sunday – than a soulful black bean soup with a gentle zip of chile.  

I like to roast the soup's aromatic vegetables instead of sautéing them; roasting deepens and intensifies their flavor – so much that if you wanted to leave out the ham hock and go vegetarian/vegan, the roasted veg will carry the day. Grinding toasted spices – coriander and cumin – fills the house with a wonderful scent.

Black bean soup with roasty veg

There's hardly any work involved: Just dice the roasted vegetables, toss them in a pot with beans, a can of tomatoes, a ham hock and the spices and let it simmer a couple hours. Debone the ham hock, whirr the soup a bit with an immersion blender, drop in the diced ham and you're in business. Serve the soup in small bowls, garnished with cilantro and sliced scallions. Try it! And tell us how you like it. 

My pissaladière: a French cook, three pounds of onions, a jar of anchovies and an overscheduled journalist add up to one snazzy starter from Provence

Pissaladiere

There I was, caramelizing onions at midnight on a Thursday night. At seven the next morning, in between dressing for work and putting on my makeup, I found myself rolling out tart pastry, organizing anchovies, putting things in and pulling them out of a hot oven. My morning workout? Not happening.

It didn't seem completely batty to offer to bring a pissaladière -- a Southern French caramelized onion-and-anchovy tart -- to dinner at my friends' house on a Friday night when the event was a couple weeks off in the future. No problem, I thought, as I normally I work from home on Fridays. But as I stared down my schedule the Wednesday before, I found myself with back-to-back-to-back meetings at the paper downtown. Working from home was not in the stars. The dinner was a Francophile dinner party at our friends Keven and George's place (also downtown); the theme was Provence. Georges had bouillabaisse on the menu as the main course. So how to manage the promised  pissaladière?

No worries -- I'd prepare the ingredients on Thursday evening, assemble and bake it in the morning, drive it (gingerly!) downtown, and let it cool its heels in my car all day while I did my thing at the paper. A quick turn in Georges' oven, and we should be great to go.

Pissaldiere ingredients

Crazy? Perhaps, given all I have on my plate at the moment. But making this classic dish is much easier it would appear, and making the tart actually turned out to be a high point in a stressful week. Have I mentioned that I'm happiest in the kitchen?

More often than not, a pissaladière is made with bread dough, but I learned to make it from an old friend, Danièle Mazet-Delpeuch, who makes hers using pâte briseé  -- a savory tart crust. We could argue about bread vs. pâte briseé all day long, and Danièle is not from Nice (from whence the dish comes), but rather Dordogne. But I think she has it right: The flavor of sweet, deep onions with salty anchovies melting into them show more deliciously on a flaky crust.

Interesting side note: Danièle was a home cook, queen of the hearth oven in the kitchen of her family's 500-year-old stone farmhouse, when François Mitterand -- who was president of France at the time -- tapped her to be his private chef at the Élysée Palace. They made a movie about her a few years ago called Haute Cuisine; Catherine Frot did a wonderful job portraying Danièle. Here's an interview Epicurious did with Danièle when the movie was released in the U.S. In any case, she's a wonderful cook, and an amazing spirit. A true cook without borders if ever there was one.

Pate brisee

But back to our regularly scheduled tart.

So, the first thing to do is caramelize onions -- a lot of them. It's a slow caramelization, and I'm completely opposed (morally, gastronomically and vehemently) to adding sugar to speed the caramelization. Required: a sharp knife, a low flame and patience.

Slice thin about three pounds of yellow onions in a little olive oil (or better yet duck fat, if you have some) and let them cook very slowly for more than two hours, till they're deep golden and sweet. Then you drain them. While the onions caramelize, make your pâte briseé. Give flour and salt a whirl in the food processor, toss in bits of chilled butter, pulse till it has the texture of coarse meal, add an egg lightly beaten with a dollop of milk, let the motor run till it clumps together. Honestly, it's that simple.

Let the dough rest in the fridge half an hour, roll it out, fit it into a tart pan with a removable bottom, pour in the onions, smush them in nicely, garnish the top with anchovies, niçoise olives and bits of fresh thyme, pop it in the oven, and in 35 minutes, you have a gorgeous pissaladière. Click on the black bar below for the recipe.

Pissaladiere

Place in shopping bag, drive to the office, spend the day getting things done, arrive at K and G's, present tart, demand Ricard. (That's is the beloved anisette aperitif of Southern France.) 

Note to self: Next time I make this, do it on a weekend!


A superfood salad (and more) for super-wonderful friends

Last night my friends Nicola and Habib came over to help me judge (and eat!) a couple of dishes I was testing for a cookbook review. 

The book I'll be reviewing (I'll try to post it next weekend) is Lidia's Mastering the Art of Italian Cuisine; Lidia would be Lidia Matticchio Bastianch – you may know her from her PBS show Lidia's Kitchen

You can't invite just anyone if you're testing a recipe for rabbit, but I had a feeling English-born Nicola and French-Tunisian Habib would be game (pun intended). And they were! The other recipe I tested was spaghetti alla carbonara. 


But hmmm – nothing green there. How to make sure my pals had their veg? Got it! We'd nosh on crudités while I was finishing up the cooking; I'd put them out with a red pepper-harissa dip I've been making and serving to friends for eons. I made the dip about an hour before they arrived and stuck it in the fridge so the flavors would come together. Here's the recipe:

And before we dug into the carbonara and rabbit, I'd give them a salad. I wanted something with some weight, and serious greens. Just the thing: baby kale with roasted sweet potato and pomegranate seeds. Should I put in some goat cheese? Nah – better idea: toasted pecans. I could toast a bunch and use them in both the salad and the dip. 

I'm not usually a huge fan of balsamic vinegar, but it's just right with the kale and sweet potatoes, and its depth balances the bright flavor of the pomegranates. And here's something really cool: All four of the salad's main ingredients are superfoods. A superfood salad for super friends! Please try it – and tell me if you like it as much as we did.